From a simple electronic toothbrush to complicated robotics systems, DC motors are present everywhere. In most of our previous Arduino projects, we have used these DC motors as actuators and regardless of the application, controlling the speed and direction of these motors is essential to make them functional and effective.
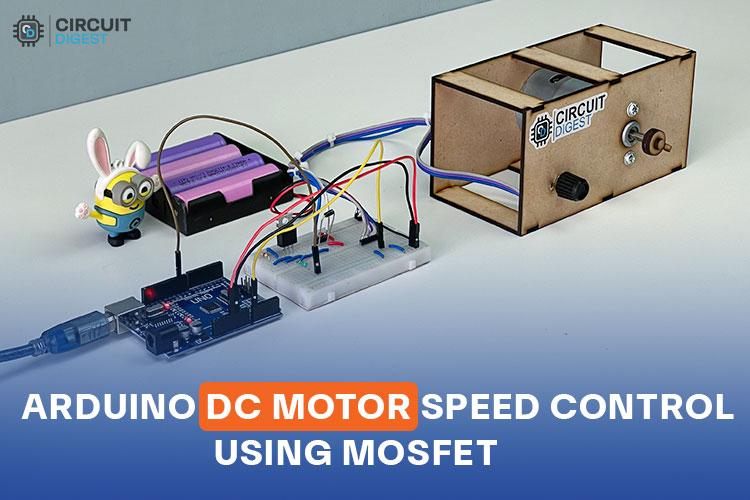
So in this article, we will cover the basic concept of controlling the speed of a DC motor with a potentiometer, using Arduino’s PWM signal with the help of a MOSFET Transistor. Below, you can see a working setup of our project, which we will be building in this article.
The Arduino DC Motor Speed Controller is a versatile, low-cost design that not only controls motors but also LEDs, heating elements, and more. It is easy to build and offers adjustable speed and power settings. Previously we have also build many other types of DC motor speed and direction control steps you can also check them out from list below
1. DC Motor Control using Arduino and L293D H-bridge IC
2. DC Motor Speed control using 2N222 Transistor
3. Dual Motor Speed control using DRV8833 Module
4. DC Motor Speed and Direction control using Relay
Like, mentioned earlier for this project we will learn how to control the DC motor easily using a simple MOSFET and DIY breadboard circuit. Before going to the components Required, let us look at the most important part, Selecting a Suitable Mosfet for Our Project.
How To Select MOSFET for Controlling Speed of DC Motor?
Selecting MOSFET May look tricky at the beginning but believe me, it’s very easy and simple. I let you know how I selected a MOSFET for this Project. First, let us look at the Gate Voltage to get the best out of MOSFET.
Input Parameters that need to be considered
Generally, it's mandatory to understand the relationship between gate-source voltage (Vgs) and drain-source current (Id). In our case, we are using an Arduino UNO, which operates at 5V, and that’s the voltage level of its input and output pins. Therefore, the MOSFET we select must support a gate input voltage of 5V to provide a maximum output within its limit.
Below is a good example to differentiate between two MOSFETs with slightly similar names, IRLZ44N and IRFZ44N. If you examine the graph carefully, you will see that for a gate-source voltage (Vgs) of 5V, the IRLZ44N can output a drain current of up to 100A Maximum, whereas the IRFZ44N can only output 30A Maximum. So, look for a similar graph in your selected MOSFET’s datasheet and verify it.
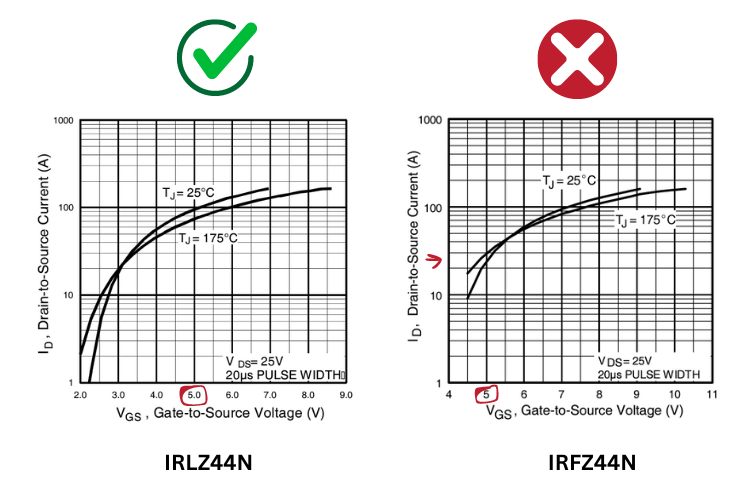
There might be a case where the selected MOSFET does not support a 5V input. In that case, you must incorporate a MOSFET driver circuit.
Now, we need to know about Our Load:
Essential Load Parameters that need to be considered
Primarily, there are two types of loads: resistive and inductive. When selecting components based on the type of load, it's important to remember that if you are working with an inductive load, such as a motor, you should add a diode in parallel with the load to protect the FET from generated reverse EMF. Most FETs on the market have a built-in diode that performs this function, so in that case, an external diode provides extra protection. For resistive loads, such as LEDs or heaters, there is no need for additional protection since they have a straightforward linear relationship between voltage and current.
The next thing to note about the load is its maximum voltage and current requirements
For example:
I am using a DC motor of type 775 - 12V, which is commonly used for motor tools applications, DIY projects, etc.
After some internet searches, I found various datasheets from different manufacturers, leading to some confusion due to the different models available. If you have a motor from an authenticated manufacturer, refer to their datasheet for accurate specifications.
In my case, I chose to collect the required data manually. This is straightforward if you have a regulated power supply (RPS) or similar power supplies and a multimeter. Here is the data I collected:
Maximum Checked Voltage: 30V
Maximum Stall Current: 2.5A
Nominal Voltage: 12V
Nominal Current (no load condition): 300mA
So, in my opinion, a MOSFET with a maximum drain current greater than 5A and a maximum drain-source voltage of 36V should work fine for a long time.
Once you finished knowing about the Load, you need to know
With this data, we move on to the next step of Selection of Mosfet on the internet.
Selecting the Right MOSFET:
With the above-known data, start searching the internet, and you will find the right MOSFET that suits your budget and needs. For optimal selection, the rule is simple: if you need a 10A model, a 20A model is more than enough, and anything less than 10A will be inadequate. So, set some limitations in your choice and select the right one.
In my case, I searched for the most affordable MOSFET in my local market and found the IRLZ44N. It is well-suited for my application, supporting a drain-source voltage of up to 55V, a drain current of up to 47A, and most importantly, it supports 5V logic levels.
Let's move to the section of Components Requirements!
Components Required to Build the Arduino DC Motor Speed Controller
Listed below are the required components to build the Arduino DC Motor Speed Controller:
- Arduino UNO - x1
- IRLZ44N - x1
- 1k Ohm Resistor - x1
- 10K Ohm Potentiometer - x1
- Bread Board - x1
- USB A to USB B Cable - x1
- 12V Power Source - Any
- Jumper Wires - Required Quantity
Arduino DC Motor Speed Controller using MOSFET - CircuitDigram
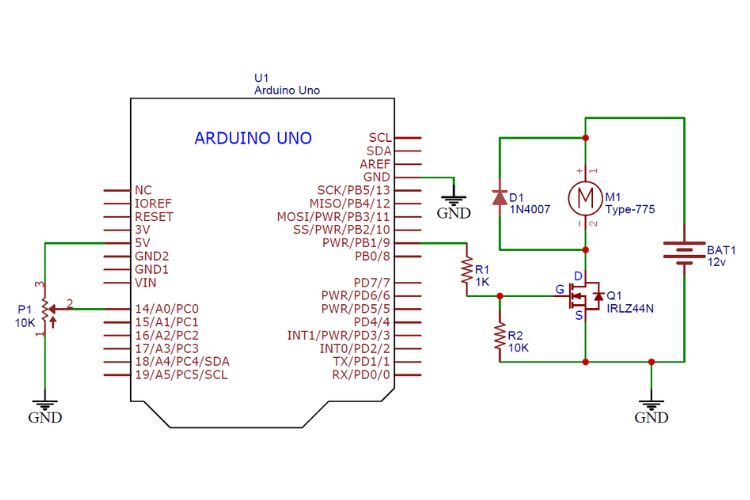
Below, you will find the circuit diagram of the Arduino DC Motor Speed control using MOSFET Transistor. It is simple and uses a minimal number of components, making it easy to understand. If you are also looking to control the direction of the motor in addition to controlling the speed, you can check out our alternative project that uses the L293D to control the DC Motor.
Our goal is to control the speed of a DC motor using an Arduino UNO and a potentiometer. A MOSFET is used because we can't drive a high-power inductive load with just the logic level output of the Arduino UNO. The MOSFET is placed between the Arduino UNO and the motor, effectively acting as a motor driver. The MOSFET is connected to the 9th pin of the Arduino UNO via a 1k Ohm resistor to limit the current. You might wonder why we selected the 9th pin instead of another pin. The reason is simple: we chose a random pin with PWM capability. Technically, the Arduino UNO has six PWM pins (3, 5, 6, 9, 10, 11). Pins 3, 9, 10, and 11 produce a 490 Hz PWM signal, while pins 5 and 6 produce a 980 Hz PWM signal. For higher frequency speed control, use pins 5 or 6; for normal speed, any other PWM pin will work.
A 10k Ohm potentiometer is used here. The ends of the resistive track are connected to 5V and ground, respectively, and the wiper pin is connected to the A0 analog input pin of the Arduino UNO. As the wiper moves from one side to the other, it generates a different voltage within the range of 0 to 5V, which is fed to the 10-bit ADC of the Arduino UNO.
As mentioned before, a general-purpose diode is connected in parallel with the motor to reject the reverse EMF produced by the motor's coil. A separate 12V power supply is provided for the motor.
Let us move to the Components Assembly of Arduino DC Motor Speed Control.
Arduino DC Motor Speed Controller - Hardware Setup
Moving on to component assembly, since our circuit is very simple, we used a breadboard to interconnect the components. We used a power bank to power the Arduino UNO and a 4S Li-ion battery pack to power the motor. The rest of the connections are as per the circuit diagram discussed above. Below, you can see the overall assembled image.
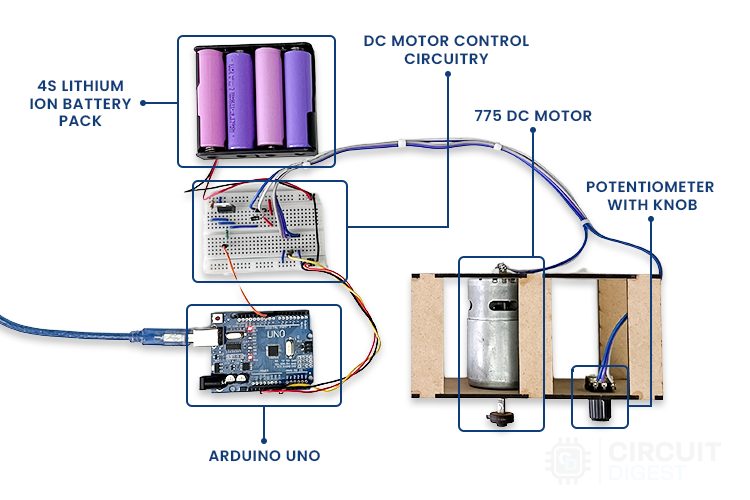
The below image provides a close-up shot of the circuit connections for your reference.
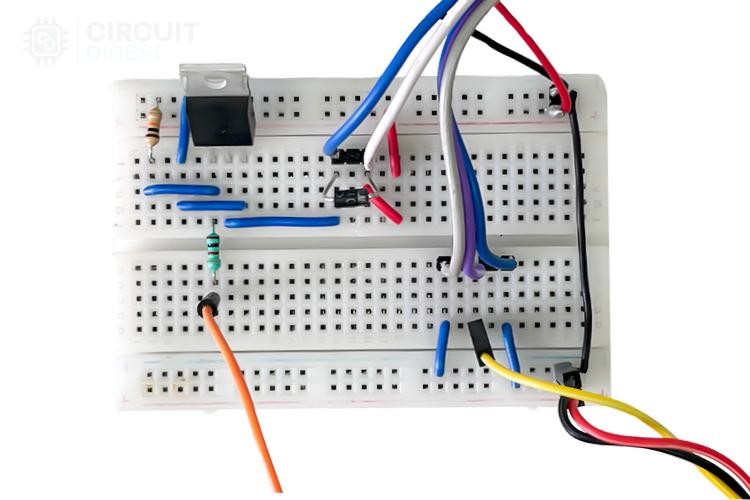
While using the breadboard, kindly verify once that the breadboard is in good condition, ensuring it has a strong connection strength to hold the jumper wires. This helps avoid unnecessary time wasted in troubleshooting errors that may occur due to issues with the breadboard.
So, let's get into the code explanation.
Arduino DC Motor Speed Controller Example Code
The code section is straightforward in its objective, hence it's concise. Initially, the 9th pin is declared as motorPin and configured as an OUTPUT pin in the setup() function.
const int motorPin = 9; // Pin Where the Gate of MOSFET is Connected

void setup()
{
  pinMode(motorPin, OUTPUT); // MotorPin is Configured as OUTPUT
}
In the loop() function, two main operations are taking place. Firstly, the analog data from the potentiometer is acquired, and secondly, the duty cycle of the PWM output on the motorPin is modified.
The potValue obtained from the potentiometer is not directly passed to the analogWrite() function. Instead, the map() function is used to scale the value of the ADC output (ranging from 0 to 1023) to the range of 0 to 255. This is necessary because the ADC (Analog-to-Digital Converter) used in Arduino is 10-bit, providing 1024 discrete values. However, the PWM (Pulse Width Modulation) used for analogWrite() is 8-bit, allowing only 256 discrete values. Therefore, mapping the 10-bit ADC values to the 8-bit PWM range ensures compatibility and accuracy in controlling the motor speed. To know More about PWM Kindly visit our article What is PWM.
void loop()
{
  int potValue = analogRead(A0);  // Analog Value from Potentiometer
  analogWrite(motorPin, map(potValue, 0, 1023, 0 , 255)); // Mapping the Pot value and passing it directly to the MotoPin as a dutycycle of PWM
}
Overall Code was Added Below.
const int motorPin = 9; // Pin Where the Gate of MOSFET is Connected

void setup()
{
  pinMode(motorPin, OUTPUT); // MotorPin is Configured as OUTPUT
}

void loop()
{
  int potValue = analogRead(A0);  // Analog Value from Potentiometer
  analogWrite(motorPin, map(potValue, 0, 1023, 0 , 255)); // Mapping the Pot value and passing it directly to the MotoPin as a dutycycle of PWM
}
Next, let's move to the Simulation part of the Arduino DC Motor Speed Controller Project.
Stimulation of Arduino DC Motor Speed Controller
Let us simulate the Arduino DC Motor Speed Controller project using TinkerCad before moving to the real-time working demonstration. Below is the TinkerCad simulation provided for your reference.
In this simulation, you may notice that the MOSFET used here is a general-purpose one, not our selection. It's because we don't have that specific model in TinkerCad. But don’t worry, using this simulation, you can check the code logic and general working of the project.
Working Demonstration of Arduino DC Motor Speed Controller
Finally, we have reached the awaited working demonstration of Arduino DC Motor Speed Control using a MOSFET. As expected, it is working fine. However, there is something you need to know at this point: the motor won't turn on until the minimum required power (average voltage) is supplied by the MOSFET. In the demonstration below, you can see this issue.
To solve this, there are several ways. One of the easiest ways is to adjust the mapping range in the Arduino code.
For example:
map(potValue, 0, 1023, 0, 255) -> map(potValue, 0, 1023, 100, 255)
The value 100 needs to be verified by trial and error to determine if it is the minimum power required to rotate the motor.
Below are Some More Projects that expand your knowledge in Controlling DC motors.
Discover Exciting Projects in a Similar Realm:
1) DC Motor Speed Control using Arduino and Potentiometer
More or less, a similar project you can try is where the logic remains the same, but instead of driving a large motor, a small motor is driven using the transistor.
2) DC Motor Control using Arduino
Build a motor control system using the L293D, an H-Bridge IC, which can also perform tasks like changing the direction of the motor.
3) Control DC Motor with Arduino and L293D Motor Driver IC
In this project, you will learn to interface the L293D motor driver IC with Arduino and control two motors simultaneously. Concepts like this would be useful when you make a remote-control car or similar projects.
Complete Project Code
const int motorPin = 9; // Pin Where the Gate of MOSFET is Connected
void setup()
{
pinMode(motorPin, OUTPUT); // MotorPin is Configured as OUTPUT
}
void loop()
{
int potValue = analogRead(A0); // Analog Value from Potentiometer
analogWrite(motorPin, map(potValue, 0, 1023, 0 , 255)); // Mapping the Pot value and passing it directly to the MotoPin as a dutycycle of PWM
}

