Problem Statement -
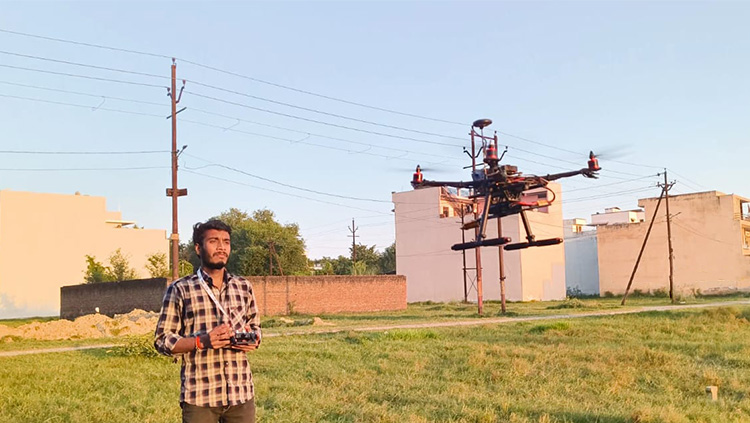
According to the report, our army personnel has to constantly monitor the Himalayan region, at such a height even a normal person has trouble breathing, due to which the life of the soldiers is in danger all the time and due to unknown attacks, soldiers in war. There is a danger to life and property. Mostly helicopters cannot fly on such high hills. our brave soldiers reach such heights only on foot. In these areas with the most dangerous weather on earth. Terrorist attacks pose a significant threat to global security, often resulting in mass casualties and widespread devastation. Traditional counter-terrorism measures, such as intelligence gathering and security checkpoints, are often reactive and struggle to prevent these attacks. There is a critical need for a proactive system that can accurately identify and neutralize high-value targets before they can carry out their plans
Solution -
Our facial recognition missile system offers a potential solution to this pressing problem. By accurately identifying and targeting specific individuals, your system has the potential to disrupt terrorist activities and prevent future attacks. The ability to eliminate high-value targets with precision could significantly enhance counter-terrorism efforts and protect innocent lives.
However, several challenges need to be addressed. Ensuring the system's accuracy and reliability in real-world conditions is crucial. Addressing ethical concerns around targeted killings is also essential.
Abstract -
A drone is a flying robot that is controlled remotely by humans. The main purpose of drones is to make those tasks easier, which are risky for humans, and as you all know Drone strikes and technology are increasing day by day. New weapons are being made. Drones are mostly used for military-related tasks. Because due to their being unmanned, there is no danger of the pilot's life in the war. Seeing these accidents, I have made a drone made from advanced technology. It has provided many facilities like a face-recognized based missile that has been used to kill enemies with drones. Through Artificial Intelligence, the drone is capable of going to enemy territory without any human intervention. Identifying the face of the enemy and hitting the target. Also designed for search and rescue operations. While doing search and rescue operations, there are some places where it is difficult to wipe the drone So by landing the rover in it. By object detection method we can detected further activities by artificial intelligence. Thus, the unidentified attacks by falcon drones can be avoided and the live of military forces can be saved as well as other people. It works very accurately and fast.
Impact Statement
My project is a system that can identify an enemy's face within three seconds and guide a missile to attack them. This advanced technology will improve the safety of our soldiers by letting us target the enemy with precision. The algorithm can even recognize fake faces, so the enemy won't be able to fool it. Successful hardware and simulation tests prove that this system will be effective in the field.
Components Required
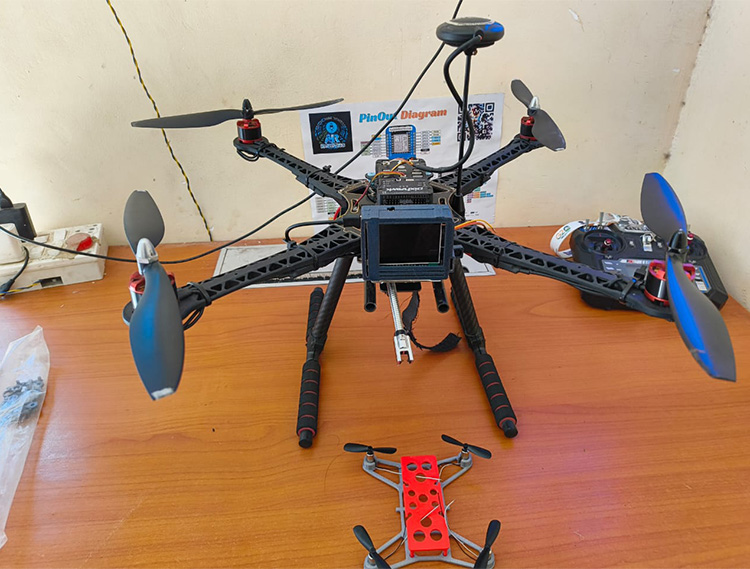
1. Pixhawk Controller KIT
2. Electronic Speed Controllers (ESC)
3. Brushless Motors
4. 5200 MAH LIP0 Battery
5. SIPEED MAIXDUINO Kit (for Face Recognition)
6. Electric Lighter
7. Servo motor
8. FlySky Transmitter, Receiver (6Channel)
9. S500 Quadcopter Drone Frame
10. Potassium Nitrate (Missile Fuel) / Rocket
<
Circuit Diagram
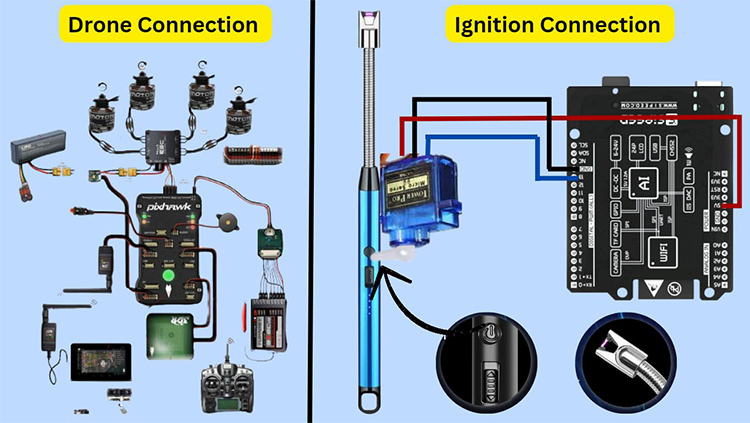
Explanation & Software Side Implementation And Model Training With MaixHub
Model Training Process On MaixHub
MaixHub is an intuitive, cloud-based platform that simplifies the training and deployment of machine learning models
specifically tailored for embedded systems like Maixduino. It handles dataset management, training, and model export
with a few clicks, allowing seamless integration with hardware for tasks like face recognition.

Step 1: Data Collection And Preparation
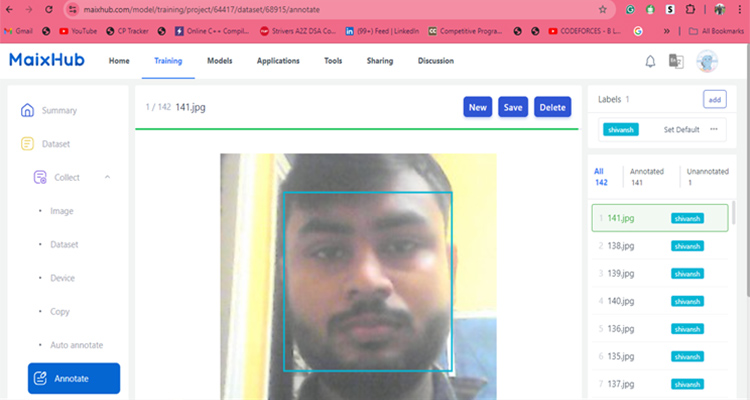
Before training the model, we first needed to collect data for the classes, "shivansh" and "Ashish". In this process
involved capturing face images from different angles, lighting conditions, and facial expressions. The goal was to
build a robust dataset that could handle variability in real-world conditions.
Dataset Size: Around 50-150 images per class.
Image Quality: All images were resized to 224x224 pixels (MaixHub's required input size) and saved in JPEG format.
Data Augmentation: Although MaixHub has an automatic data augmentation process, additional manual augmentation (like rotating, flipping, and adjusting contrast) helped enhance dataset variability. This is important for improving the model’s performance on unseen data.
Step 2: Uploading Dataset To MaixHub
Once the dataset was prepared, it was uploaded to MaixHub for training. The platform provides a simple interface where
the user can create a new project and upload images.
1.Creating a New Project: After logging into MaixHub, a new project was created under the object detection category.
2. Uploading Classes: The two classes (Shivansh, Ashish) were defined in the platform, and their corresponding images were uploaded. This allowed MaixHub to associate each image with the correct label during training.
3. Data Augmentation: MaixHub applies automatic data augmentation techniques, including:
Rotation: Small degrees of rotation (±15°).
Horizontal Flipping: Randomly flips images.
Brightness and Contrast Adjustments: Random variations to simulate different lighting conditions.
Step 3: Configuring The Training Parameters
MaixHub offers flexibility in defining training parameters, which helps optimize model performance. For this project,
the following configurations were used:
Input Size: The model’s input size was set to 224x224 pixels. This resolution is ideal for running on low-power edge devices like Maixduino, balancing speed and accuracy.
Anchors: Predefined anchor boxes were used to aid object detection. These anchors serve as reference shapes for bounding boxes, ensuring accurate face localization.
anchors = [4.62, 3.28, 4.75, 5.0, 4.31, 4.38, 4.88, 3.77, 5.53, 4.08]
Learning Rate: Set to an optimal value for face detection, ensuring the model converged at a good speed without overfitting.
Epochs: The model was trained for 50 epochs. Each epoch represents a full cycle through the training dataset, allowing the model to adjust weights for improved accuracy.
Batch Size: Set to 8, which worked well for the dataset size and computing resources.
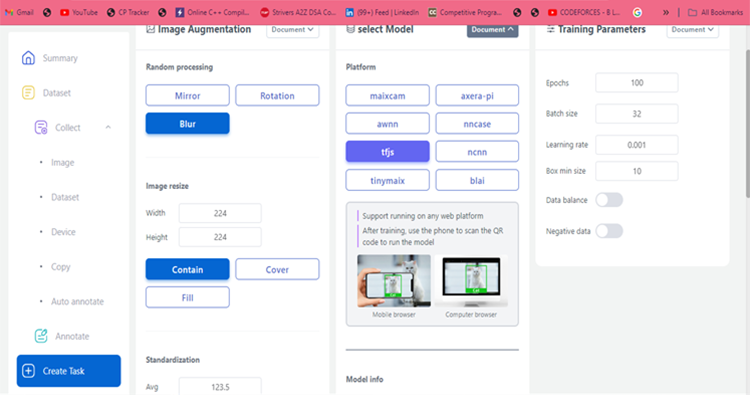
Step 4: Training The Model
After configuring the training parameters, the training process began. MaixHub provides real-time monitoring of training progress,
which includes:
Loss Function: A loss function calculates the difference between predicted and actual outputs. The objective is to minimize this loss over time.
Accuracy: This shows how well the model is classifying the images. MaixHub tracks accuracy and updates the user on each training epoch.
During the training process, MaixHub visualized the accuracy and loss curves. If the loss was not decreasing adequately, adjustments were made (e.g., tweaking the learning rate or the dataset). After about 30 minutes, the training completed with a loss below 0.2 and accuracy above 95%, which is sufficient for real-time face detection applications.
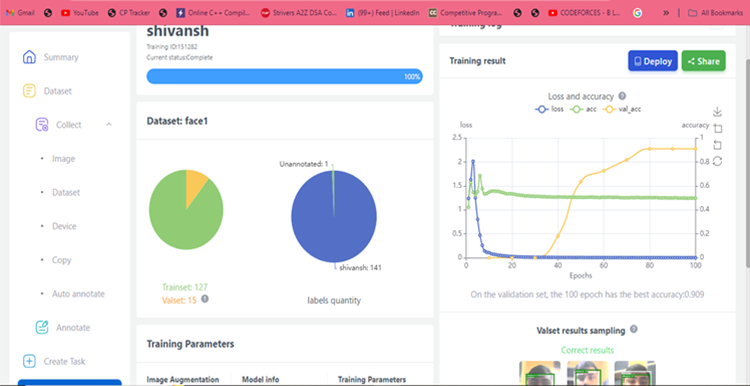
Step 5: Testing The Model On MaixHub
Before downloading the trained model, MaixHub allows you to test it with uploaded validation images (images that the model has not seen during training). This step ensures that the model generalizes well to new images and avoids overfitting.
Validation Results: The model successfully detected faces from both classes with high confidence values, showing that it can distinguish between `shivansh` and `Ashish`.
Step 6: Model Export
Once satisfied with the training results, the model was exported in `.kmodel` format, which is a lightweight, optimized file format supported by the KPU (Kendryte Processing Unit) on Maixduino.
Model Address: The `.kmodel` was stored on an SD card for easy access by the Maixduino board.
model_addr = "/sd/model-153144.kmodel"
Step 7: Deploying The Model To Maixduino
After transferring the `.kmodel` file to the SD card, the Maixduino program loads and uses the model for face detection in real-time.
1. Model Loading: The model is loaded using the KPU library in MaixPy, and face detection is initiated through the YOLOv2 object detection method.
task = kpu.load(model_addr)
kpu.init_yolo2(task, 0.7, 0.5, 5, anchors)
Tools Used For Code Implementation
Programming Environment: MaixPy IDE (Python-based IDE for Maixduino).
MaixPy IDE is an integrated development environment designed to simplify the process of programming and debugging Maix boards such as Maixduino, which use Kendryte K210 AI processors. It is specifically created to work with MicroPython, a lightweight version of Python optimized for microcontrollers, making it easier to develop AI and IoT applications on embedded systems.
Libraries Used:
sensor: For camera initialization and capturing images.
image: For image processing and drawing on the LCD.
lcd: For controlling the display.
kpu: For model inference using the KPU neural network processor.
PWM and Timer: For controlling the servo motor.
UART: For communication via serial.
Hardware:
Maixduino Board: The core processing unit.
GC0328 Camera: Captures images for face detection.
Servo Motor: Controlled based on face detection results.
LCD Display: Displays live camera feed and detection results.
Power Source: USB or battery for portable use.
Code Structure and Explanation
The code can be divided into several functional blocks: initialization of components, image capture, model inference, servo control, and UART communication. Each of these elements works together to create a system where the camera captures frames, detects faces, and moves the servo motor accordingly.
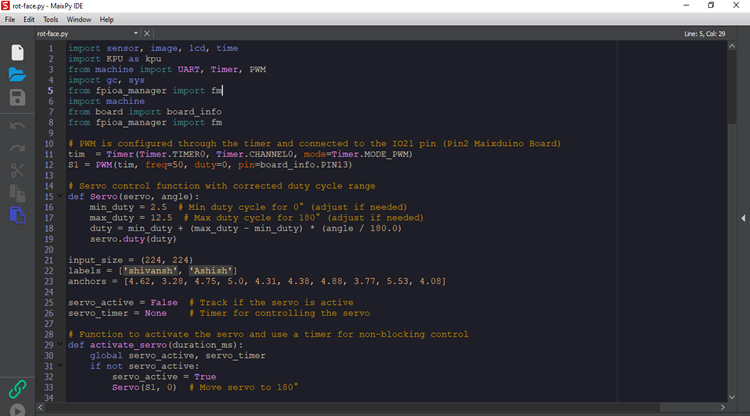
Initialization of Components
PWM Timer for Servo Motor Control:
A Timer (Timer.TIMER0) and PWM are initialized for controlling the servo connected to IO21 on the Maixduino board.
The PWM frequency is set to 50Hz, which is typical for controlling servo motors. Initially, the servo is set to 0 degrees.
tim = Timer(Timer.TIMER0, Timer.CHANNEL0, mode=Timer.MODE_PWM)
S1 = PWM(tim, freq=50, duty=0, pin=board_info.PIN13)
def Servo(servo, angle):
S1.duty(((angle * 9.45) / 180) + 2.95)
UART Setup:
UART communication is initialized for sending results (detected object data) to another device (e.g., a PC or another board).
def init_uart():
fm.register(10, fm.fpioa.UART1_TX, force=True)
fm.register(11, fm.fpioa.UART1_RX, force=True)
uart = UART(UART.UART1, 115200, 8, 0, 0, timeout=1000, read_buf_len=256)
return uart
2. Image Capture and Processing
Camera Initialization:
The sensor library initializes the camera in RGB565 format with a QVGA resolution. The camera captures images for face detection.
sensor.reset()
sensor.set_pixformat(sensor.RGB565)
sensor.set_framesize(sensor.QVGA)
sensor.set_windowing(input_size)
sensor.set_hmirror(sensor_hmirror)
sensor.set_vflip(sensor_vflip)
sensor.run(1)
LCD Initialization:
The lcd library is used to initialize and control the display. The LCD rotation and background clearing are also configured here.
lcd.init(type=1)
lcd.rotation(lcd_rotation)
lcd.clear(lcd.WHITE)
3. Model Inference
Loading the KPU Model:
The pre-trained face recognition model, exported from MaixHubin .kmodel format, is loaded into the Maixduino’s KPU (neural network processor).
The KPU’s YOLOv2 network detects objects, with a confidence threshold of 0.7 and non-max suppression threshold of 0.5.
task = kpu.load(model_addr)
kpu.init_yolo2(task, 0.7, 0.5, 5, anchors)
Detecting Faces:
The captured image is passed through the KPU model to detect faces. If faces are detected, bounding boxes are drawn around the faces on the LCD.
objects = kpu.run_yolo2(task, img)
if objects:
for obj in objects:
pos = obj.rect()
img.draw_rectangle(pos)
img.draw_string(pos[0], pos[1], "%s : %.2f" %(labels[obj.classid()], obj.value()), scale=3, color=(0, 255, 0))
Ignition
When a face is detected, the servo motor rotates to 180° and stays there for 3 seconds. Afterward, it returns to its initial 0° position to start ignitor.
Servo(S1, 180) # Rotate servo to 180°
time.sleep(3)
Servo(S1, 0) # Return to 0° after 3 seconds
Sending Detection Data via UART
The bounding box positions, object class, and detection confidence are sent via UART. This can be used to communicate results to another system for further processing.
comm.send_detect_result(objects, labels)
Error Handling and Display
The lcd_show_except() function displays any errors encountered during runtime directly on the LCD screen.
def lcd_show_except(e):
import uio
err_str = uio.StringIO()
sys.print_exception(e, err_str)
err_str = err_str.getvalue()
img = image.Image(size=input_size)
img.draw_string(0, 10, err_str, scale=1, color=(0xff,0x00,0x00))
lcd.display(img)
2. Inference:
The model receives live camera input, processes each frame, and outputs face detection results. The results include bounding boxes around detected faces and the confidence score associated with each detection. The system also moves the servo motor based on the face recognition results.
For all the code, follow the GitHub link below:
Complete Project Code
<!doctype html>
<html>
<head>
<meta charset="utf-8">
<meta name="viewport" content="width=device-width,initial-scale=1">
<title>Face Recognition Access Control</title>
<style>
@media only screen and (min-width: 850px) {
    body {
         display: flex;
    }
     #content-right {
         margin-left: 10px;
    }
}
body {
    font-family: Arial, Helvetica, sans-serif;
    background: #181818;
    color: #EFEFEF;
    font-size: 16px;
}
#content-left {
    max-width: 400px;
     flex: 1;
}
#content-right {
    max-width: 400px;
     flex: 1;
}
#stream {
    width: 100%;
}
#status-display {
    height: 25px;
    border: none;
    padding: 10px;
    font: 18px/22px sans-serif;
    margin-bottom: 10px;
    border-radius: 5px;
    background: green;
    text-align: center;
}
#person {
    width:100%;
    height: 25px;
    border: none;
    padding: 20px 10px;
    font: 18px/22px sans-serif;
    margin-bottom: 10px;
    border-radius: 5px;
    resize: none;
    box-sizing: border-box;
}
button {
    display: block;
    margin: 5px 0;
    padding: 0 12px;
    border: 0;
    width: 48%;
    line-height: 28px;
    cursor: pointer;
    color: #fff;
    background: #ff3034;
    border-radius: 5px;
    font-size: 16px;
    outline: 0;
}
.buttons {
    height:40px;
}
button:hover {
    background: #ff494d;
}
button:active {
    background: #f21c21;
}
button:disabled {
    cursor: default;
    background: #a0a0a0;
}
.left {
    float: left;
}
.right {
    float: right;
}
.image-container {
    position: relative;
}
.stream {
    max-width: 400px;
}
ul {
    list-style: none;
    padding: 5px;
    margin:0;
}
li {
    padding: 5px 0;
}
.delete {
    background: #ff3034;
    border-radius: 100px;
    color: #fff;
    text-align: center;
    line-height: 18px;
    cursor: pointer;
}
h3 {
    margin-bottom: 3px;
}
</style>
</head>
<body>
<div id="content-left">
 <div id="stream-container" class="image-container"> <img id="stream" src=""> </div>
</div>
<div id="content-right">
 <div id="status-display"> <span id="current-status"></span> </div>
 <div id="person-name">
   <input id="person" type="text" value="" placeholder="Type the person's name here">
 </div>
 <div class="buttons">
   <button id="button-stream" class="left">STREAM CAMERA</button>
   <button id="button-detect" class="right">DETECT FACES</button>
 </div>
 <div class="buttons">
   <button id="button-capture" class="left" title="Enter a name above before capturing a face">ADD USER</button>
   <button id="button-recognise" class="right">ACCESS CONTROL</button>
 </div>
 <div class="people">
   <h3>Captured Faces</h3>
   <ul>
   </ul>
 </div>
 <div class="buttons">
   <button id="delete_all">DELETE ALL</button>
 </div>
</div>
<script>
document.addEventListener("DOMContentLoaded", function(event) {
 var baseHost = document.location.origin;
 var streamUrl = baseHost + ":81";
 const WS_URL = "ws://" + window.location.host + ":82";
 const ws = new WebSocket(WS_URL);
 const view = document.getElementById("stream");
 const personFormField = document.getElementById("person");
 const streamButton = document.getElementById("button-stream");
 const detectButton = document.getElementById("button-detect");
 const captureButton = document.getElementById("button-capture");
 const recogniseButton = document.getElementById("button-recognise");
 const deleteAllButton = document.getElementById("delete_all");
 // gain, frequency, duration
 a=new AudioContext();
 function alertSound(w,x,y){
   v=a.createOscillator();
   u=a.createGain();
   v.connect(u);
   v.frequency.value=x;
   v.type="square";
   u.connect(a.destination);
   u.gain.value=w*0.01;
   v.start(a.currentTime);
   v.stop(a.currentTime+y*0.001);
 }
 ws.onopen = () => {
   console.log(`Connected to ${WS_URL}`);
 };
 ws.onmessage = message => {
   if (typeof message.data === "string") {
     if (message.data.substr(0, 8) == "listface") {
       addFaceToScreen(message.data.substr(9));
     } else if (message.data == "delete_faces") {
       deleteAllFacesFromScreen();
     } else if (message.data == "door_open") {
         alertSound(10,233,100); alertSound(3,603,200);
     } else {
         document.getElementById("current-status").innerHTML = message.data;
         document.getElementById("status-display").style.background = "green";
     }
   }
   if (message.data instanceof Blob) {
     var urlObject = URL.createObjectURL(message.data);
     view.src = urlObject;
   }
 }
 streamButton.onclick = () => {
   ws.send("stream");
 };
 detectButton.onclick = () => {
   ws.send("detect");
 };
 captureButton.onclick = () => {
   person_name = document.getElementById("person").value;
   ws.send("capture:" + person_name);
 };
 recogniseButton.onclick = () => {
   ws.send("recognise");
 };
 deleteAllButton.onclick = () => {
   ws.send("delete_all");
 };
 personFormField.onkeyup = () => {
   captureButton.disabled = false;
 };
 function deleteAllFacesFromScreen() {
   // deletes face list in browser only
   const faceList = document.querySelector("ul");
   while (faceList.firstChild) {
     faceList.firstChild.remove();
   }
   personFormField.value = "";
   captureButton.disabled = true;
 }
 function addFaceToScreen(person_name) {
   const faceList = document.querySelector("ul");
   let listItem = document.createElement("li");
   let closeItem = document.createElement("span");
   closeItem.classList.add("delete");
   closeItem.id = person_name;
   closeItem.addEventListener("click", function() {
     ws.send("remove:" + person_name);
   });
   listItem.appendChild(
     document.createElement("strong")
   ).textContent = person_name;
   listItem.appendChild(closeItem).textContent = "X";
   faceList.appendChild(listItem);
 }
 captureButton.disabled = true;
});
</script>
</body>
</html>


