A flex sensor is a low-cost, easy-to-use variable resistor that is designed to measure the amount of deflection it experiences when bent. The sensor's resistance is lowest when it's flat on the surface, increases when we bend it slowly and reaches its maximum when it's at a 90-degree angle.
Flex sensors are popular because they are used in many different applications like game controllers, data gloves, motion trackers, and even in biomedical devices to register static and dynamic postures. So in today's project, we will learn all about flex sensors, how it works, and how you can interface them with an Arduino.
Flex Sensor Pinout
The flex sensor, also sometimes called as bend sensor, has two pins, one is P1 and the other one is P2, these two pins can be used to retrieve data from the flex sensor. The sensor acts more like a variable resistor, whose resistance changes based on how much it is bent, hence just like a resistor, the pins on this sensor are also interchangeable. The pinout of Flex Sensor is given below:
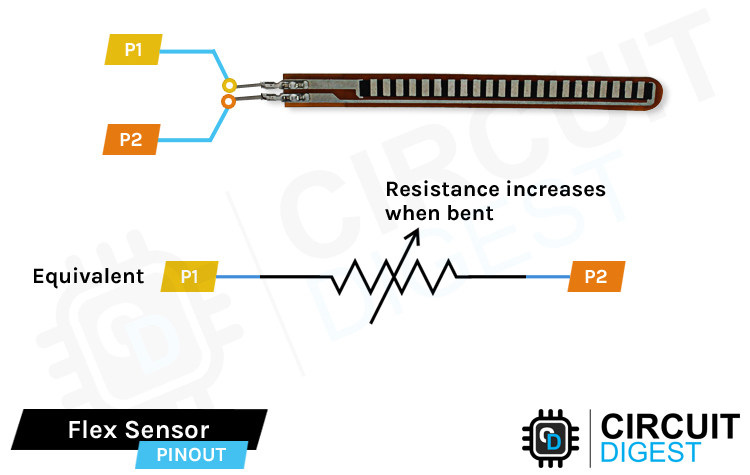
Resistors have two leads, there is no polarity for a resistor and hence can be connected in both directions. Since the flex sensor acts as a resistor, pins P1 and P2 are exactly the same.
How does a Flex Sensor Work?
In layman's terms, a flex sensor is a variable resistor that varies its resistance upon bending. As the resistance of the sensor is directly proportional to the amount of bending, it's often called Flexible potentiometer. This sensor is commonly available in two sizes, the first is 2.2” and the second one is 4.5” long. When the sensor is straight the resistance is about 10K, and when the sensor is bent the value is 22K.
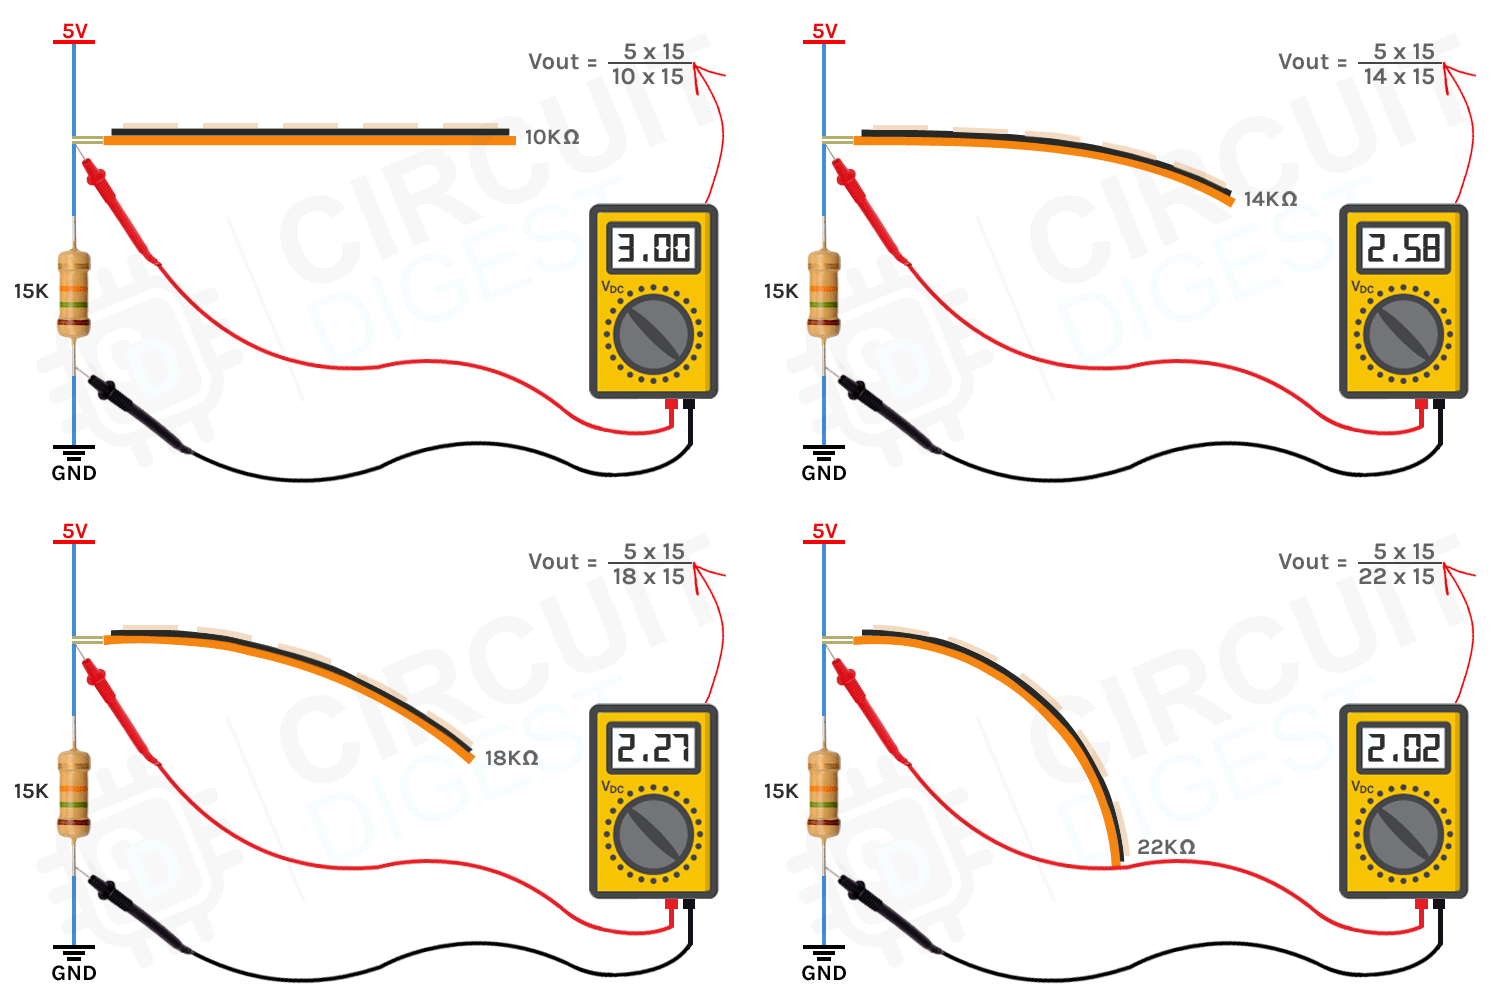
When the sensor is bent the conductive layer inside the sensor gets stretched, the cross-section of the sensor gets thinned and the resistance of the sensor increases. For example, shown above, the max resistance we can achieve is 22K. When the sensor is straightened again, the resistance returns to its normal value.
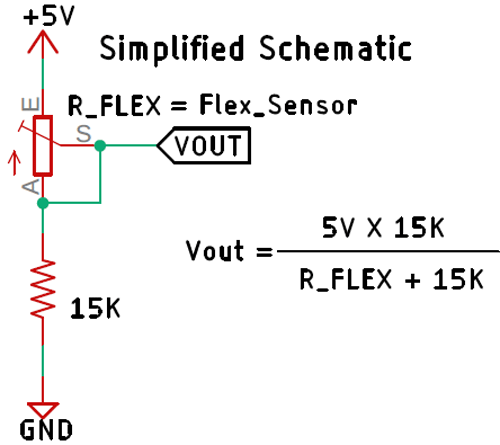
To explain the working we are using a 15K fixed value resistor to form a voltage divider circuit with the flex sensor and if you just put the value in a voltage divider equation or an online voltage divider calculator, you can verify the values. More detailed practical explanation is given below.
Flex Sensor - Parts
The construction of a Flex sensor consists of different materials. The sensor we are using is made out of conductive ink protected with Phenol Formaldehyde Resin substance. A segmented conductor is placed on top of this construction in which resistance changes upon deflection which is why it can be produced in a great form factor in a thin flexible substrate. When the substrate is bent, the sensor produces a resistance output correlated to the bend radius - the smaller the radius, the higher the resistance value.
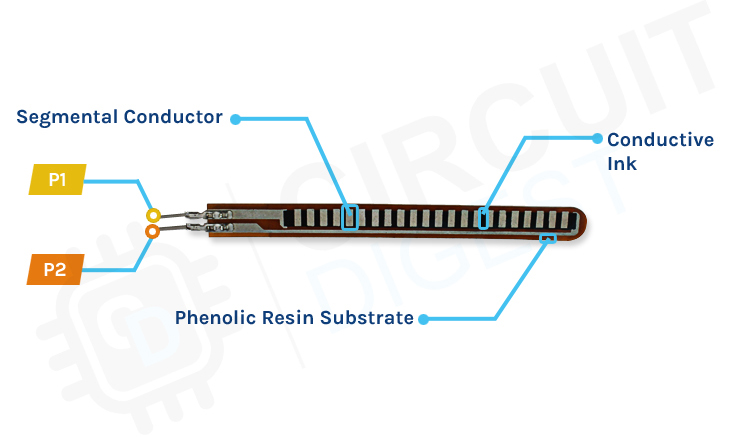
The flex sensors are designed to be bent in only one direction, as shown in the figure below, bending the sensor in the opposite direction can inflict permanent damage to the sensor. Also, you need to be careful with the bottom of the sensor where the pins of the sensor are crimped because that part of the sensor is very fragile and can break easily when it's bent over.
Arduino Flex Sensor Tinker Cad Simulation
Let’s simulate it on ThinkerCAD before testing it on the breadboard. Here is the Thinkercad simulation for the Arduino Flex sensor.
Click on the start simulation button to test the circuit. You can adjust the sensor value by clicking on the sensor, and dragging the mouse curer up and down while holding it. The Tinkercad code for the Arduino Flex sensor will show the flex level using the 5 LEDs connected to Arduino. If you want to edit the code please click the code button and modify as needed.
Commonly Asked Questions about Flex Sensor
Is the flex sensor analog or digital?
The output of the flex sensor is analogous in nature, but you have to add an additional resistor and construct a voltage divider with the flex sensor for analog output. If you want to get a digital signal from the sensor then you need to add additional circuitry to the sensor.
Can you solder a flex sensor?
While you can solder to the flex sensor's solder tabs, it's recommended for advanced users who have experience with soldering. For those soldering to the flex sensor, you would need to solder at a lower temperature and ensure that the soldering iron is not heating the tab for more than 1 second.
How accurate are flex sensors?
They can be as accurate as measuring 5 degrees (depending on the configuration) but as long as you are willing to calibrate it, that is frequently the most challenging part. Make sure you set it up in such a way that you can replicate it and do your own tests.
What is inside the flex sensor?
A flex sensor is a kind of sensor which is used to measure the amount of defection otherwise bending. The designing of this sensor can be done by using materials like plastic and carbon. The carbon surface is arranged on a plastic strip, and when this strip is bent, the sensor's resistance will be changed.
Can you cut a flex sensor?
The simple answer is yes – Flex sensors are printable circuits that should maintain their sensing capabilities when trimmed.
Arduino Flex Sensor Circuit Diagram
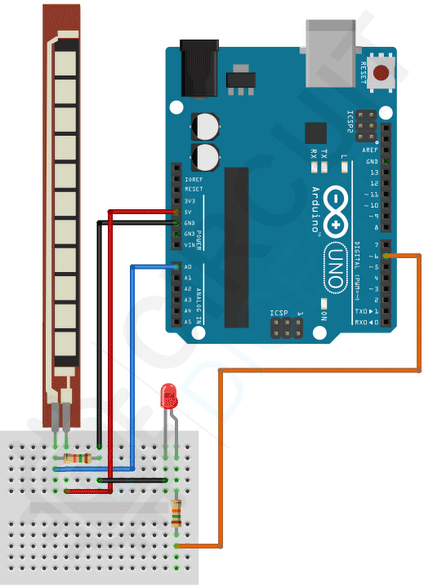
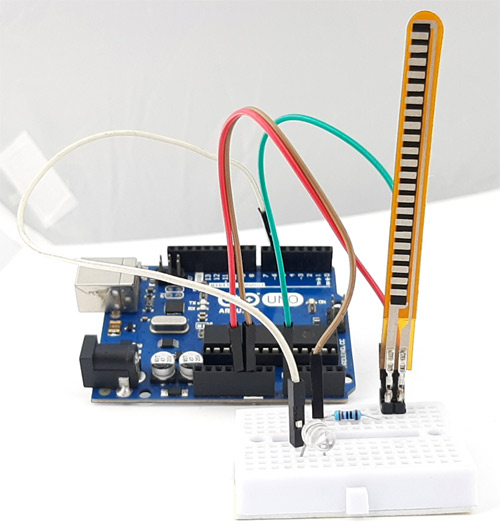
Now that we have a complete understanding of how a Flex sensor works, we can connect all the required wires to the Arduino UNO board.
The arduino flex sensor circuit is very simple and easy to understand. To read the flex sensor we need to make a voltage divider circuit with the flex sensor. We have used a 15K resistor with the Arduino to make this voltage divider circuit. Also for demonstration, we have attached an LED to PWM pin 6. With the code and circuit, the brightness of the LED will start increasing depending on the resistance change of the flex sensor.
A voltage divider circuit is a very common circuit in electronics that takes a higher voltage and converts it to a lower voltage by using a pair of resistors. The formula for calculating the output voltage is based on Ohm's Law and it's shown above in the diagram. The sensor we are using gives us a minimum value of 16K when it's flat and a max value of 17.5K. If you put these values into the formula shown above in the simplified schematic, you will get the output voltage from the sensor.
Flex Sensor Arduino Code
Here is a simple Arduino sketch that reads the output data from the sensor with the help of the ADC in Arduino and changes the brightness of the LED depending upon the amount of flex it has.
We start our arduino flex sensor code by defining the pins for the flex sensor and LED. Next, we define some variables where we have defined all the required parameters like VCC, the value of the resistor used to make the voltage divider, minimum and maximum value of the sensor at 0 and 90-degree angles.
#define sensorPin = A0; // Flex Sensor is connected to this pin
#define PWMPin = 6; // LED is attached to this Pin
float VCC = 5; // Arduino is powered with 5V VCC
float R2 = 10000; // 10K resistor is
float sensorMinResistance = 16000; // Value of the Sensor when its flat
float sensorMaxResistance = 17500; // Value of the Sensor when its bent at 90*
Next, we have our setup() function. In the setup function, we have initialized the serial and defined the sensorPin as input.
void setup() {
  Serial.begin(9600); // Initialize the serial with 9600 baud
  pinMode(sensorPin, INPUT); // Sensor pin as input
}
Next, we have our loop function. In the loop function, our main objective is to calculate the resistance. For that, we read the analog A0 pin and store the values in the ADCRaw variable.
int ADCRaw = analogRead(sensorPin);Next, we have calculated the voltage value from the ADC value with the help of a simple voltage divider formula.
float ADCVoltage = (ADCRaw * VCC) / 1023; // get the voltage e.g (512 * 5) / 1023 = 2.5VNext, we calculate the resistance of the flex sensor using basic voltage divider formula and map it to control the LED.
float Resistance = R2 * (VCC / ADCVoltage - 1);
float ReadValue = map(Resistance, sensorMinResistance, sensorMaxResistance, 0, 255);
Next, we used the mapped value to call an analogWrite function to control the brightness of the LED and also printed the value out for debugging.
analogWrite(PWMPin, ReadValue);
Serial.println(ReadValue);
delay(100);
Working of the Flex Sensor Module
The gif below shows the Arduino Flex Sensor working. At first, you can see the intensity of the LED on the breadboard is very low but when we bend the sensor a little bit, the intensity of the LED increases. This is how you can see the flex sensor is working exactly as we wanted it to be.
Projects using Flex Sensor
Previously we have used this flex sensor to build many interesting projects. If you want to know more about those topics, links are given below.
Arduino based Angry Bird Game Controller
Build your own game controller with an Arduino and flex sensor. If you want to add more interactivity to your games, this project can be a good one for you.
This project gives you a basic idea about synthesizers and how it works, and to add more interactivity to this project we have combined it with a flex sensor so that we can generate tone just by tapping fingers.
Servo Motor Control by Flex Sensor
Control the rotation of the servo motor just by moving the flex sensor, or you can attach the sensor on a glove and use your finger to change the position of the servo motor. If you are a beginner and want to learn more about flex sensors, you can check out this project.
Interfacing Flex Sensor with Raspberry Pi
Learn how to interface the flex sensor with raspberry pi using ADC0804 Analog to digital converter and python. If you are a beginner with raspberry pi and want to learn more about it then this project is for you.
Supporting Files
Complete Project Code
#define sensorPin  A0 // Flex Sensor is connected to this pin
#define PWMPin  6 // LED is attached to this Pin
float VCC = 5; // Arduino is powered with 5V VCC
float R2 = 10000; // 10K resistor is
float sensorMinResistance = 16700; // Value of the Sensor when its flat
float sensorMaxResistance = 18200; // Value of the Sensor when its bent at 90*
void setup() {
  Serial.begin(9600); // Initialize the serial with 9600 baud
  pinMode(sensorPin, INPUT); // Sensor pin as input
}
void loop() {
  int ADCRaw = analogRead(sensorPin);
  float ADCVoltage = (ADCRaw * VCC) / 1023; // get the voltage e.g (512 * 5) / 1023 = 2.5V
  float Resistance = R2 * (VCC / ADCVoltage - 1); // Calculate Resistance Value
  uint8_t ReadValue = map(Resistance, sensorMinResistance, sensorMaxResistance, 0, 255); // map the values 16700 to 0  18200 to 255
  analogWrite(PWMPin, ReadValue); // Generate PWM Signal
  // Print Debug Information
  Serial.print(Resistance);
  Serial.print("  ");
  Serial.println(ReadValue);
  delay(100);
}

