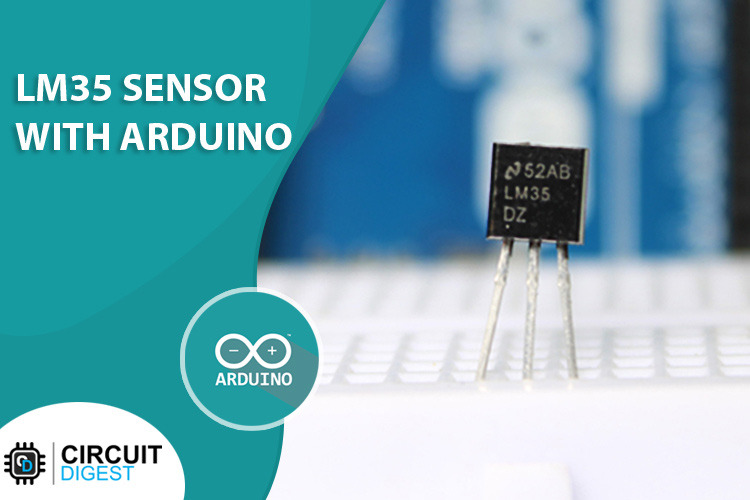
If you are looking for an inexpensive, accurate, easy-to-use temperature sensor, then LM35 is an excellent choice. It has an accuracy of ±¼°C at room temperature and ±¾°C over a full −55°C to 150°C temperature range. It does not require any external trimming, although the main drawback of this sensor is that it outputs data in analog format, making it very prone to external noise and interference. So, in this tutorial, we will learn how to wire up a LM35 Temperature Sensor with Arduino and also we will output the temperature data in the serial monitor window.
LM35 Temperature Sensor Pinout
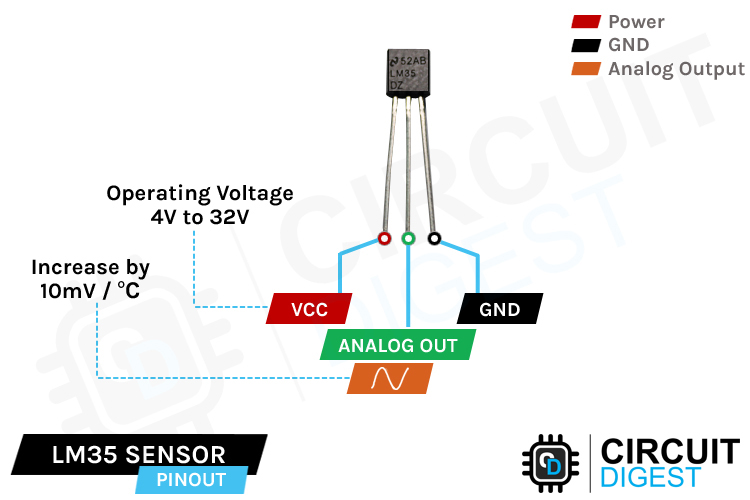
VCC is the power supply pin of the LM35 temperature sensor IC that can be connected to 4V or 32V of the supply.
GND is the ground pin of the LM35 temperature sensor IC and it should be connected to the supply ground.
OUT This is the temperature sensor analog output pin. This is the analog output pin of the temperature sensor, the output voltage on this pin is directly proportional to the temperature.
LM35 Temperature Sensor
The LM35 is a low-power, low-cost, high-precision temperature sensor designed and manufactured by Texas instruments. This IC provides a voltage output that is linearly proportional to the change in temperature.

The LM35 sensor is moderately precise and its robust construction makes it suitable for various environmental conditions. Additionally, you don't need any external component to calibrate this circuit and it has a typical accuracy of ±0.5°C at room temperature and ±1°C over a full −55°C to +155°C temperature range. It has an operating voltage of 4V to 30V and consumes 60-uA current while it's in working state, this also makes it perfect for battery-powered applications.
There are two disadvantages of this sensor. The first big disadvantage of this sensor is that it cannot measure negative temperature, for that you have to bias it with a dual polarity supply. If your project requires negative temperature measurements, you can opt for a LM36 sensor. The second disadvantage of this sensor is that it's very sensitive to noise because it outputs data in analog format. If you want to learn more about this sensor you can check out the Datasheet of LM35 Temperature Sensor IC.
How the LM35 Temperature Sensor Measures Temperature:
The LM35 temperature sensor uses the basic principle of a diode to measure known temperature value. As we all know from semiconductor physics, as the temperature increases the voltage across a diode increases at a known rate. By accurately amplifying the voltage change, we can easily generate a voltage signal that is directly proportional to the surrounding temperature. The screenshot below shows the internal schematic of LM35 temperature sensor IC according to the datasheet.
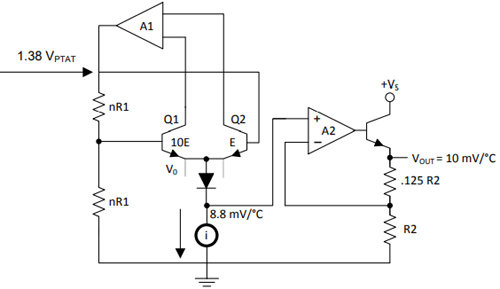
In practice, this diode that they are using to measure the temperature is not actually a PN Junction diode but its a diode-connected transistor. That is why the relationship between the forward voltage and the transistor is so linear. The temperature coefficient vs collector current graph below gives you a better understanding of the process.
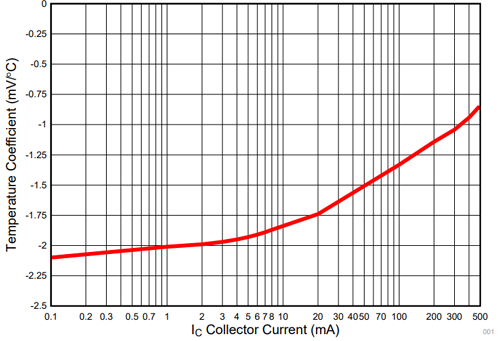
If you want to learn more about the topic, you can check out the documentation on Diode-Based Temperature Measurement Techniques by Texas Instruments.
How does the LM35 Temperature Sensor Works in our Circuit
The working of the LM35 Temperature Sensor is very simple and easy to understand. We just have to connect 5V and Ground to the sensor and we need to measure the output voltage from the output pin.
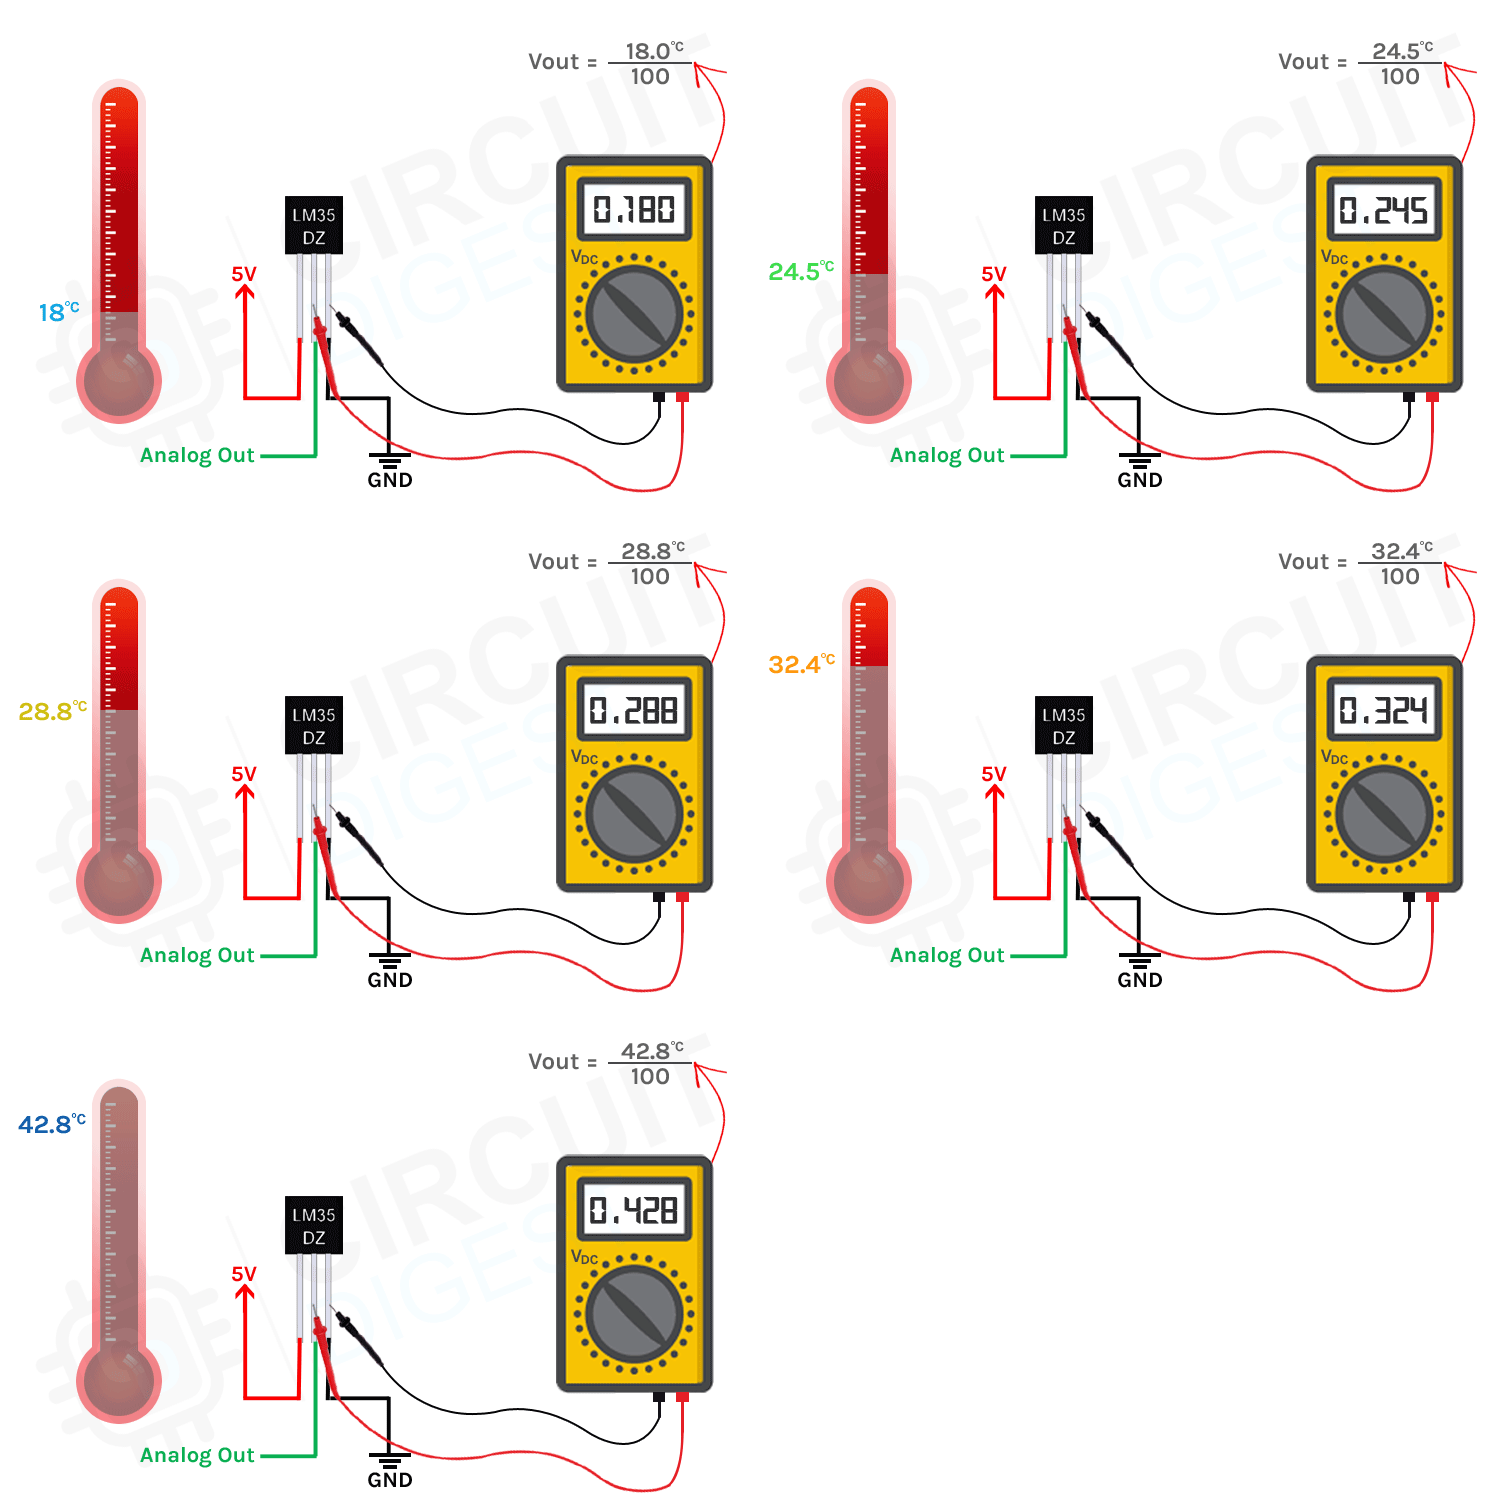
According to the datasheet of the device, the sensor should give us 10mv/°C. So, if the temperature of the room is 18°C then the sensor should give us 180mV at the output pin and the animation above shows exactly that. If you connect a multimeter to the output pin of the sensor and measure the output voltage you will get something similar. If you are getting wired voltage output from the sensor then we would recommend you to go through our previous article on LM35 Temperature Sensor Not Working? where we have encountered some weird issues that we couldn't find any solution to.
Commonly Asked Questions about the LM35 Temperature Sensor IC
What is the LM35 temperature sensor used for?
Like any other temperature sensor, it can be used for many different applications, mainly you can use it to measure body temperature of an object, and also it can measure ambient temperature.
Is LM35 a thermistor?
Thermistors have some benefits over other kinds of temperature sensors such as analog output chips (LM35/TMP36 ) or digital temperature sensor chips (DS18B20) or thermocouples.
What are the advantages and disadvantages of thermistors over LM35?
The main advantages of the thermistor are large temperature coefficient of resistance, high sensitivity, small heat capacity, fast response; but the main disadvantages are poor interchangeability and non-linearity of thermoelectric characteristics which is to expand the measurement.
What is the minimum typical temperature that the LM35 can pick up?
As the LM35 device draws only 60 µA from the supply, it has very low self-heating of less than 0.1°C in still air. The LM35 device is rated to operate over a −55°C to 150°C temperature range, while the LM35C device is rated for a −40°C to 110°C range (−10° with improved accuracy).
Arduino LM35 Temperature Sensor Circuit Diagram
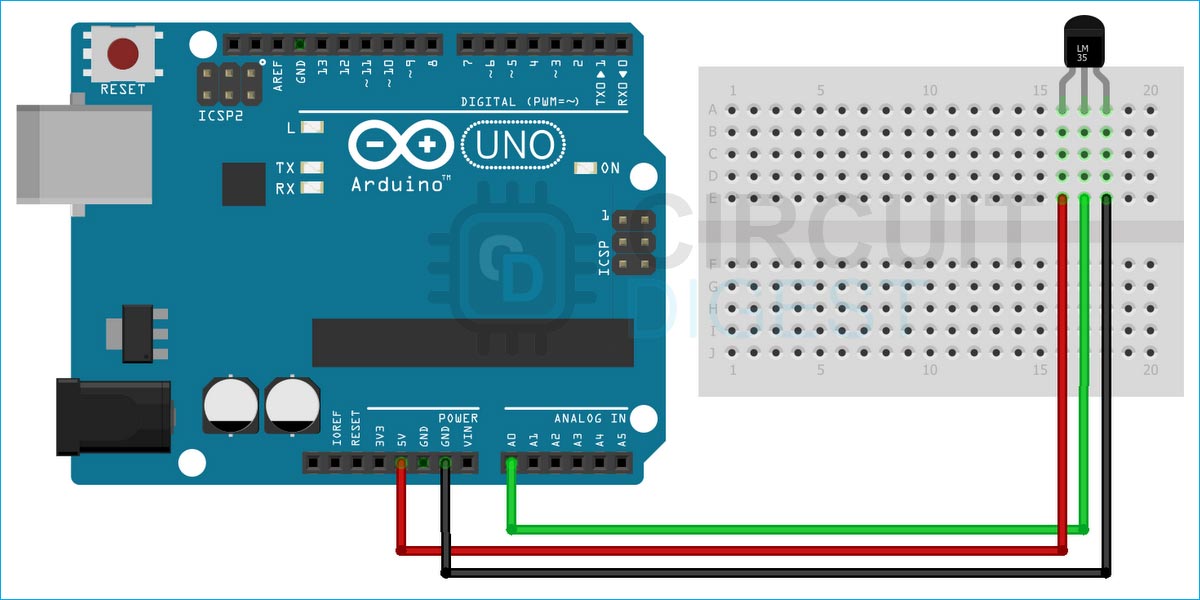
Now that we have understood how the LM35 Temperature Sensor works we can connect all the required wires to Arduino UNO. The arduino lm35 connection diagram is shown below-
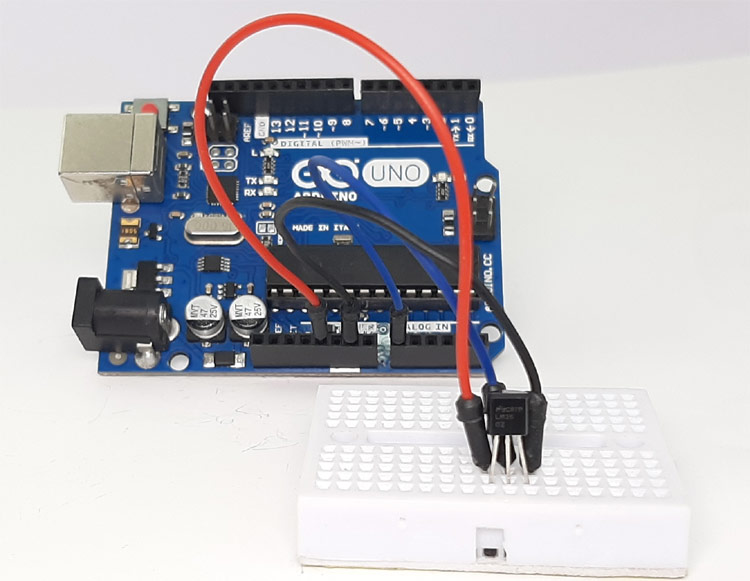
Connecting the LM35 sensor to the Arduino is really simple. You just need to connect 5V power to the sensor and you need to connect the output of the sensor to the A0 pin of the Arduino. Once the connection is done you need to write the code to convert the output voltage of the sensor to temperature data. For that, first, you need to convert the ADC values to voltage and multiply that voltage to 10 and you will get the output in temperature. With that, you’re now ready to upload the code to Arduino. An image showing the actual Arduino LM35 hardware setup is shown below.
Arduino LM35 Temperature Sensor Code
The Arduino Code for Interfacing the LM35 Temperature Sensor is very simple and easy to understand. We just need to read the analog data out of the sensor and convert it to temperature data.
We Initialize our code by defining the pin in which the LM35 Temperature sensor is connected.
#define sensor_pin A0 // LM35 is connected to this PIN
Next, we have our setup() function, in the setup, we just need to initialize the serial monitor for debugging.
void setup() {
  // Init serial at 9600 baud
  Serial.begin(9600);
}
Next we have our loop function, in the loop function we read the pin and store the ADC data in adcData variable. Next, we convert the ADC data to the voltage value and store it in a local variable named voltage, and finally, we convert the voltage value to temperature and store it in a variable named temperature and print that in the serial monitor window. At last, we added 800ms and finished the code.
void loop() {
  //Read Raw ADC Data
  int adcData = analogRead(sensorPin);
  // Convert that ADC Data into voltage
  float voltage = adcData * (5.0 / 1024.0);
  // Convert the voltage into temperature
  float temperature = voltage * 100;
  // Print the temperature data
  Serial.print("Temperature: ");
  Serial.print(temperature);
  Serial.println("*C");
  delay(800); // wait a second between readings
}
Working of the Arduino LM35 Sensor Based Temperature Measurement
The gif below shows the Arduino LM35 Temperature Sensor in action. On the left-hand side, we have placed the Arduino with the temperature sensor connected to A0 pin of the Arduino and on the right-hand side, we have our serial monitor window. When we warm up the temperature sensor with the hot air station, you can see the temperature value rises on the serial monitor window.
Projects using the LM35 Temperature Sensor
Previously we have used this LM35 Temperature sensor to build many interesting projects. If you want to know more about those topics, links are given below.
If you are a beginner in electronics and you want to learn more about 8051 Microcontroller, and ADC then this project is for you. In this project, we have interfaced the popular LM35 Temperature with 8051 to make our own Thermometer and displayed the data on a 16X2 LCD Display.
If you are new to IoT space and searching for basic projects with IoT, this project could be for you because in this project we have used a LM35 temperature sensor with the very popular ESP8266 Microcontroller to send and plot data to a thingspeak server.
If you want to learn more about the PIC microcontroller and its working, this project can be a good starting point for you, because in this project we have used the ADC of the PIC microcontroller to interface a LM35 Temperature sensor and printed the temperature data to an LCD.
If you are looking for a simple, easy to build,temperature controlled switch then this project can be a good start for you because in this project we have used the populer LM35 Temperature sensor to do just that.
Supporting Files
Complete Project Code
// LM35 is connected to this PIN

#define sensorPin A0

void setup() {

  // Init serial at 9600 baud

  Serial.begin(9600);

}

void loop() {

  //Read Raw ADC Data

  int adcData = analogRead(sensorPin);

  // Convert that ADC Data into voltage

  float voltage = adcData * (5.0 / 1024.0);

  // Convert the voltage into temperature

  float temperature = voltage * 100;

  // Print the temperature data

  Serial.print("Temperature: ");

  Serial.print(temperature);

  Serial.println("*C");

  delay(800); // wait a second between readings

}

