The soil moisture sensor is the first thing that springs to mind when it comes to building your smart irrigation system or automatic plant watering system. With this sensor in place and a little Arduino support, we can design an automatic irrigation system using arduino that can water your plants when it's needed, avoiding overwatering and underwatering.
Table of Contents
- Soil Moisture Sensor Pinout
- How does a Soil Moisture Sensor Works
- Soil Moisture Sensor - Parts
- Commonly Asked Questions about Soil Moisture Sensor Module
- Circuit Diagram for Soil Moisture Sensor Module
- Arduino Soil Moisture Sensor ThinkerCad Simulation
- Arduino Soil Moisture Sensor Circuit – Connection Diagram
- Soil Moisture Sensor with Arduino Code
- Working of the Soil Humidity Sensor Module
- Soil Moisture Sensor Arduino Projects
- Code and Schematics
In this article, we are going to interface soil moisture sensor with arduino and measure the volumetric concentration of water inside the soil. This arduino moisture sensor is designed in a way that it can output data in both digital and analog modes. We will read this data and display the output status with an LED for digital output and we will use the serial monitor or an LED with PWM for analog output. Before we get further, lets make it clear that the soil moisture sensor is also called as soil humidity sensor, so we will be using these two terms interchangeably. Now, without further ado let's get right into it.
Soil Moisture Sensor Pinout
The Soil moisture sensor a.k.a the soil humidity sensor has four pins VCC, GND, Aout, Dout. These four pins can be used to get the soil moisture data from the sensor, The pinout of the Soil Moisture Sensor are as follows:
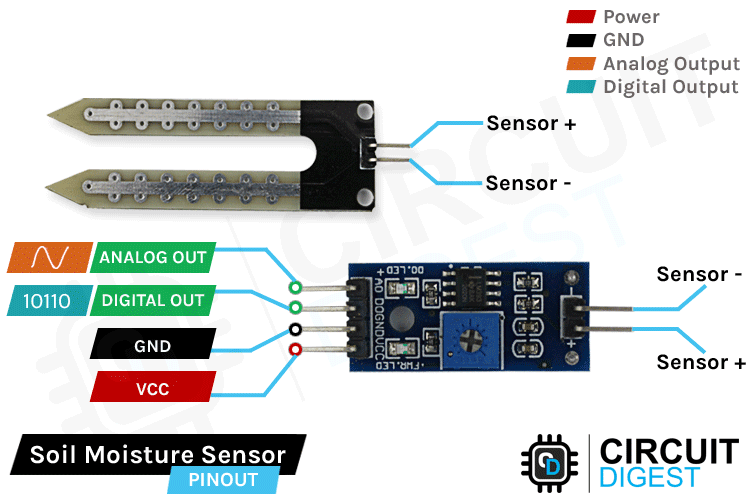
VCC is the power supply pin of the soil moisture sensor that can be connected to 3.3V or 5V of the supply. But do note that the analog output will vary depending upon the provided supply voltage.
GND is the ground pin of the board and it should be connected to the ground pin of the Arduino
DOUT is the Digital output pin of the board, output low indicates soil moisture is appropriate, and high indicates soil moisture is low.
AOUT is the Analog output pin of the board that will give us an analog signal in between vcc and ground.
How does a Soil Moisture Sensor Works
The working of the soil humidity sensor is pretty simple and straightforward, as you can see in the image below. We just need to stick the fork-shaped conductive probe to the soil, as the probe has two exposed conductive plates that will act as a variable resistor whose resistance will vary depending on the water content in the soil.
This resistance of the probe is inversely proportional to the soil moisture of the device. The more water in the soil the better the conductivity which will result in lower resistance. The less the water in the soil the poor the conductivity which means higher resistance. This arduino moisture sensor produces an output voltage according to the resistance by measuring which we can determine the moisture level.
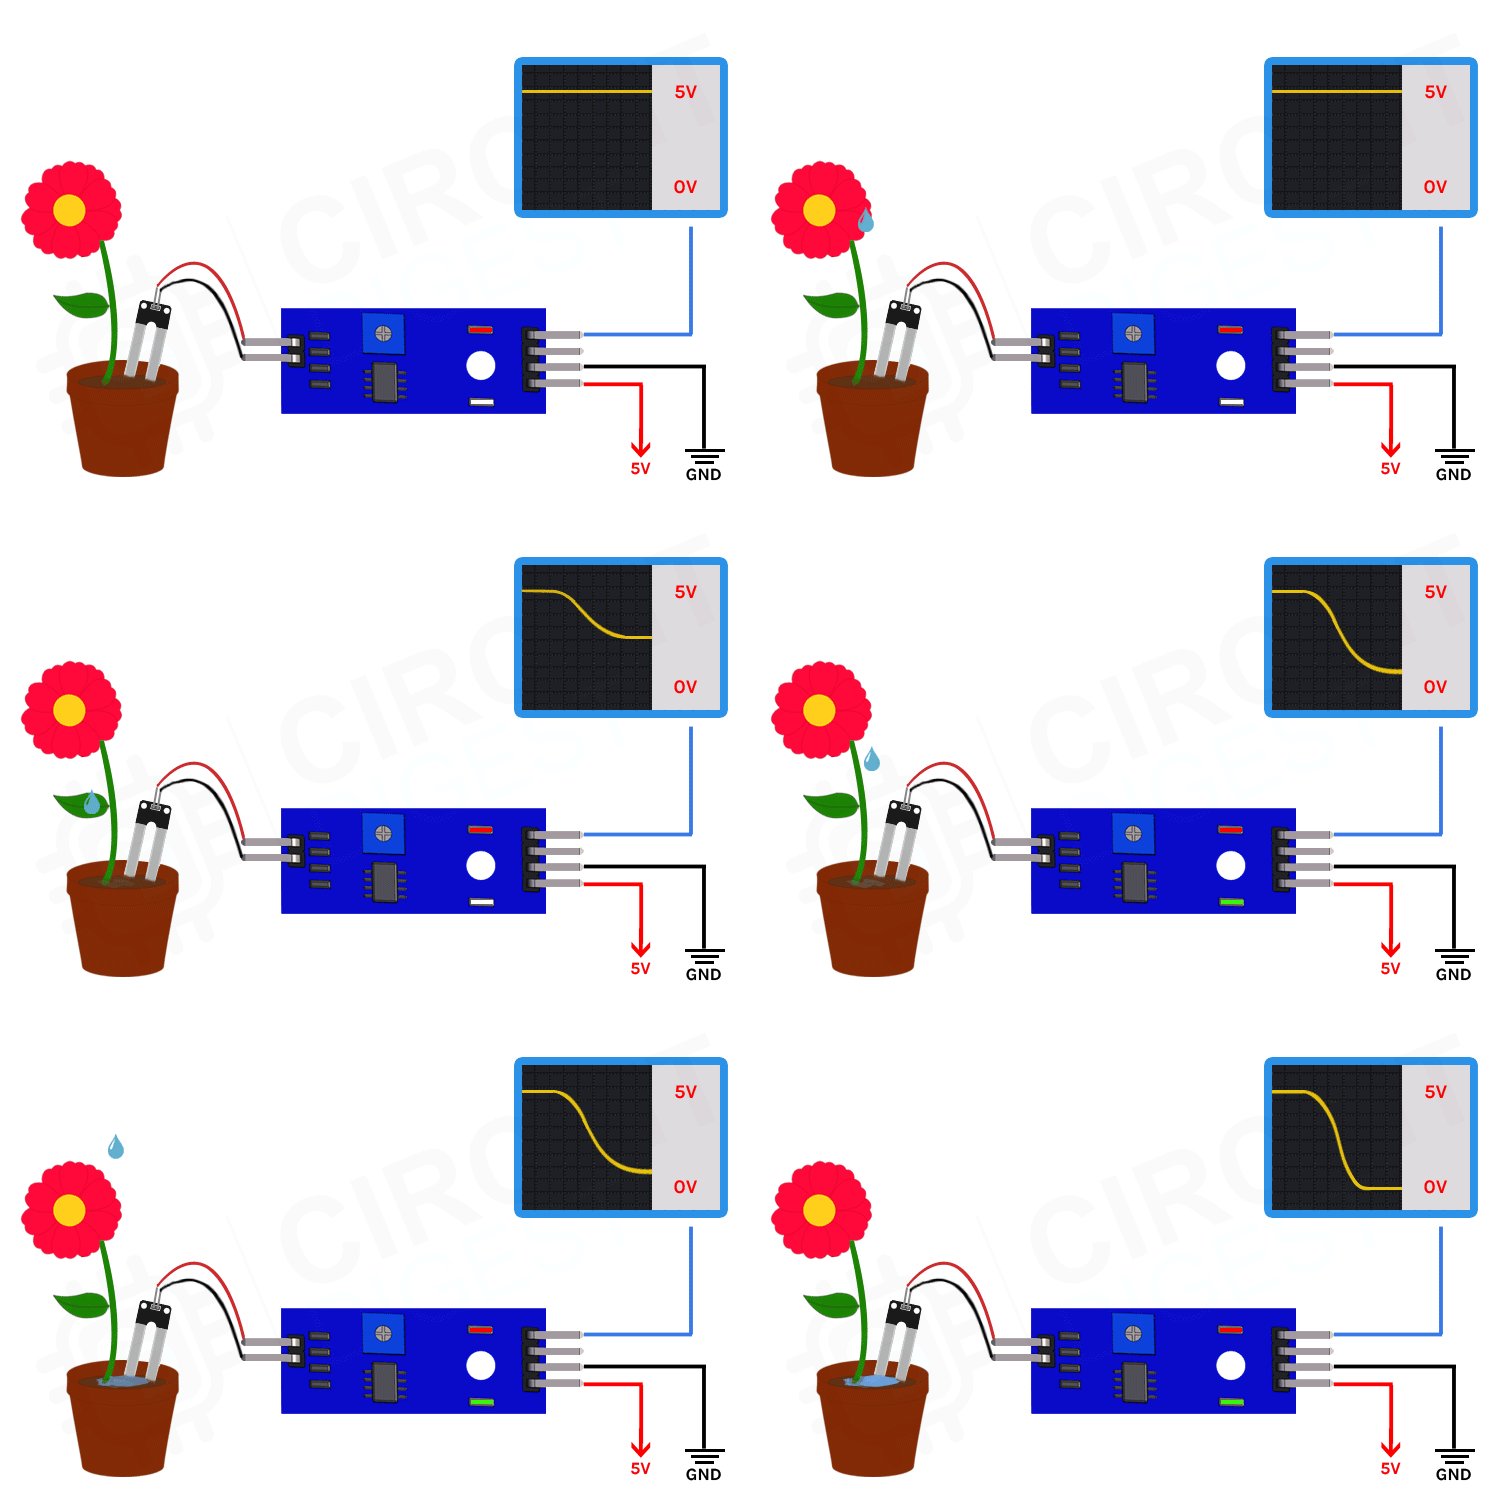
The above GIF working of Soil Moisture sensor shows how the analog output of the sensor changes based on the water level in the soil. As you can see, the voltage drops from 5V to 0V when water is added to the soil. You can also see that the signal LED on the board turns on when water is added to the soil. We have not shown how the digital pin works in the above GIF to keep things simple. When water is added to soil the digital pin moves from low (0V) to high (5V) with the help of on board comparator op-amp, you can control the sensitivity of this digital pin using the potentiometer (blue) on the module.
Soil Moisture Sensor - Parts
The entire soil humidity sensor consists of two parts: the first one is the soil moisture sensor probe and the second one is an electronic module. The module processes the incoming data from the probe and that gets processed by a microcontroller like Arduino and we get the final output.
The Soil Moisture Sensor Probe:
As we have said earlier, the sensor contains a fork-shaped probe with two big exposed conductive pads. The probe acts like a variable potentiometer, the value of which can be read by a microcontroller like Arduino.
The Soil Moisture Sensor Module:
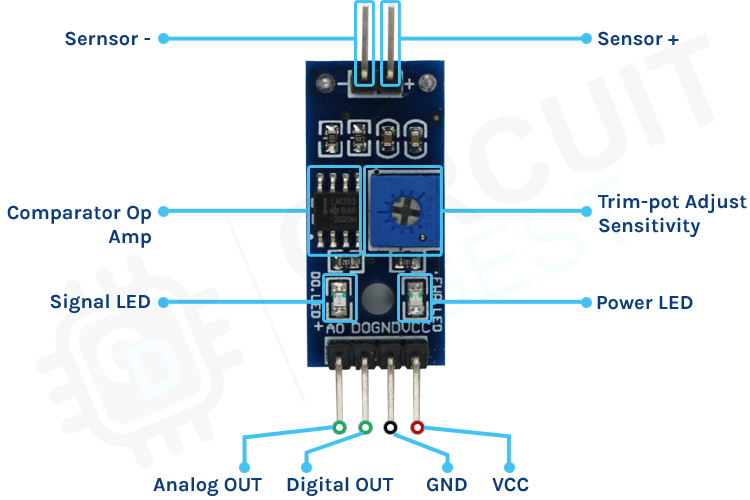
The soil moisture sensor module is there to convert the incoming analog signal to digital signal; this is designed in such a way that the sensor can be used without microcontroller support. The module consists of two signal input pins where the probe gets connected. It also has four other pins two of which are VCC and GND. The other two are Digital Output and Analog Output pins.
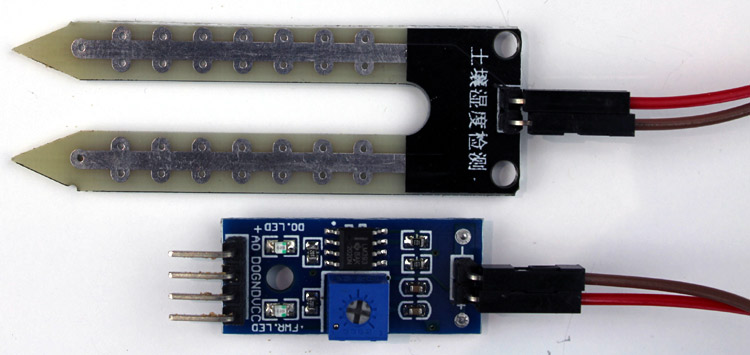
This module also consists of a High Precision Comparator, LM393 that is used to digitize the analog signal coming out of the sensor probe. The module has a built-in potentiometer that is used for sensitivity adjustment of the digital output. The main objective of the potentiometer is to set a threshold, so that when the moisture level exceeds the threshold value, the module will output LOW otherwise HIGH. This feature of the module can come in very handy because when a certain threshold is reached, you can trigger a relay that can start pumping water.
Sensors should be placed at several different depths and locations in the field. Typically, sensors are placed in pairs at one-third and two-thirds the depth of the crop root zone and at two or more locations in the field, preferably away from high points, depressions and slopes.
Commonly Asked Questions about Soil Moisture Sensor Module
My Arduino Soil Moisture Sensor is not working. What should I Check?
If you are having trouble with the Arduino soil moisture sensor, first check if all the connections are ok. The areas near the soil can get corrotated. Another thing to make sure of is to check if you have used the correct pin or not. If you want to get the moisture levels use the analog output and if you only need a trigger output at a certain level use the digital output, and don’t forget to set the trigger level using the trimmer pot.
Where should soil moisture sensors be placed?
Sensors should be placed at several different depths and locations in the field. Typically, sensors are placed in pairs at one-third and two-thirds the depth of the crop root zone and at two or more locations in the field, preferably away from high points, depressions and slopes.
How much area can a soil moisture sensor cover?
It depends on the sensor. A satellite-based passive microwave sensor will cover a very wide area of ground, while cheap Chinese hobby sensors can cover only 20-30 cm of land.
Why should soil moisture be continuously monitored?
Soil moisture monitoring can help growers efficiently use and apply water and nutrients. All soil moisture instruments provide data that help a grower make good decisions about how much water to apply and when to apply it.
Which soil moisture sensor is best? What are the other options?
The soil moisture sensor discussed here is mostly used for hobby applications. If you are looking for a professional application, the top five best soil moisture sensors are given below:
- Sonkir MS02 Soil pH Meter – Best Overall. ...
- VIVOSUN 3-in-1 Plant Moisture Meter – Best Value. ...
- Gain Express Soil pH & Moisture Meter – Premium Choice. ...
- XLUX T10 Soil Moisture Sensor Meter
- Generic Soil Moisture Sensor
Circuit Diagram for Soil Moisture Sensor Module
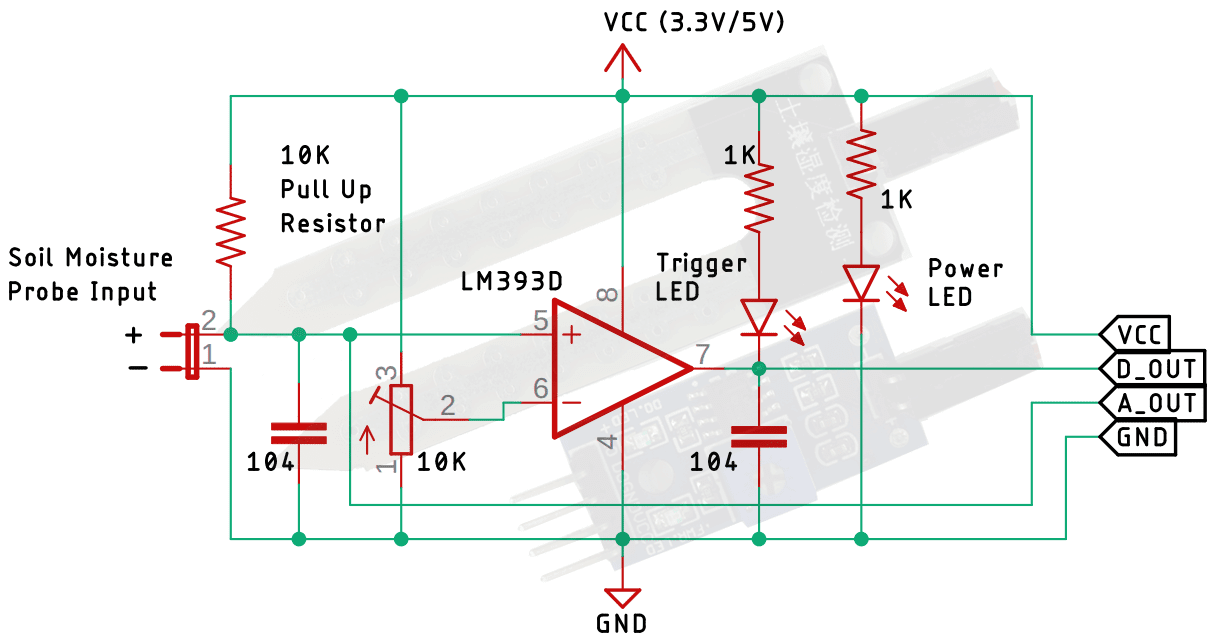
The schematic diagram for the soil moisture sensor module is shown below. The schematic itself is very simple and needs a handful of generic components to build. If you don't have a prebuilt module on hand but still want to test your project, the schematic below will come in handy.
In the schematic, we have a LM393 op-amp which is a low-power low offset voltage op-amp that can be powered from a 3.3V or 5V supply. Please note that the analog output voltage of the device will depend on the input voltage. The main job for this op-amp is to convert the incoming analog signal from the sensor probe to digital signal. There is also this 10K potentiometer that is used to set a reference voltage for the op-amp, the input voltage of the sensor goes below the threshold voltage set by the potentiometer, the output of the op-map goes low. Other than that we have two LEDs. The first one is a power LED and the other one is the trigger LED. The power LED turns on when power is applied to the board and the trigger LED turns on when a certain set threshold is reached. This is how this basic circuit works.
Arduino Soil Moisture Sensor ThinkerCad Simulation
Before testing it on a live circuit let’s simulate it on thinker cad. Here is the Thinkercad simulation for Arduino Soil moisture sensor.
Click on the start simulation button to test the circuit. You can adjust the sensor value by adjusting the slider that appears when clicking on the sensor. The Tinkercad code for Arduino Soil moisture sensor will show the humidity level using the 5 LEDs connected to Arduino. If you want to edit the code please click on the code button and modify as you need.
Arduino Soil Moisture Sensor Circuit – Connection Diagram
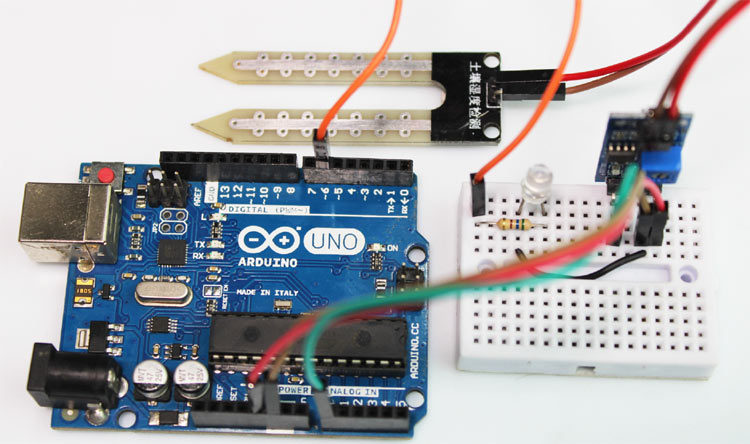
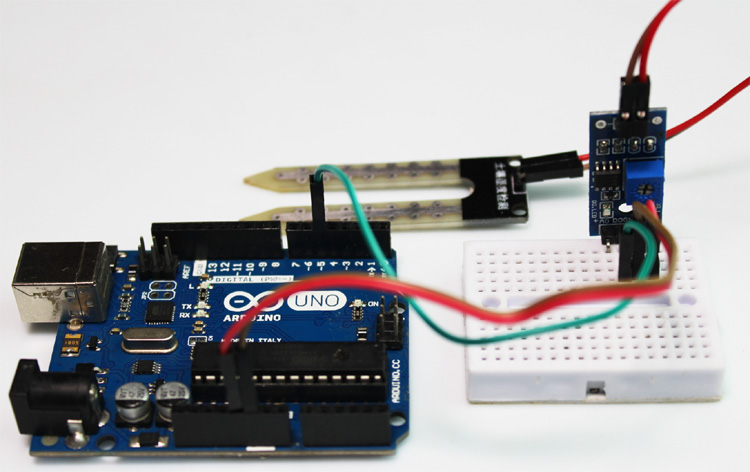
Now that we have a complete understanding of how a Soil Moisture sensor works, we can connect all the required wires to the Arduino UNO board. This section of the article will be divided into two parts, one shows analog output and another one shows the digital output. Let's begin with analog circuitry, the complete circuit to connect a soil humidity sensor with Arduino is shown below
Soil Moisture Sensor - Analog Output:
To work with the sensor we need to power the sensor first, for that we are using the 5V and GND pin of the Arduino UNO Board.
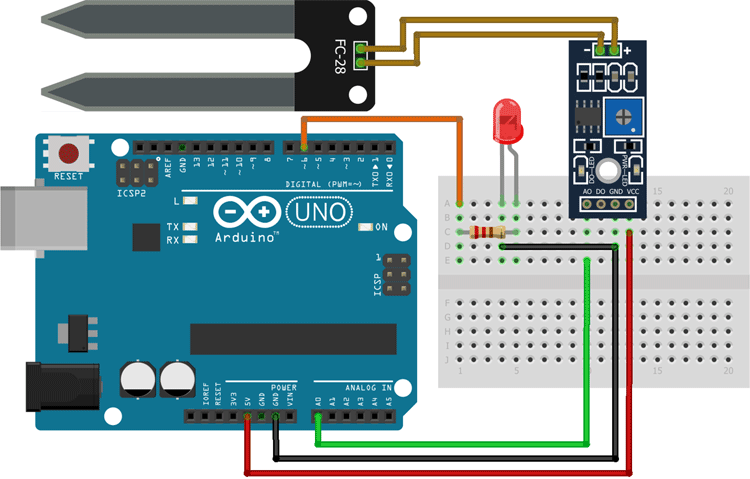
As shown in the above arduino soil moisture sensor circuit diagram we have connected an LED to digital PIN 6 of the Arduino and the analog out pin of the sensor is connected to the A0 pin of the Arduino UNO board, finally, the ground is common between the LED and the sensor. We will program the Arduino so that the brightness of the LED will change depending on the soil moisture data sensed by the probe.
Soil Moisture Sensor - Digital Output:
For the digital interface part, we are also using the +5V and Ground from the Arduino to power the sensor module.
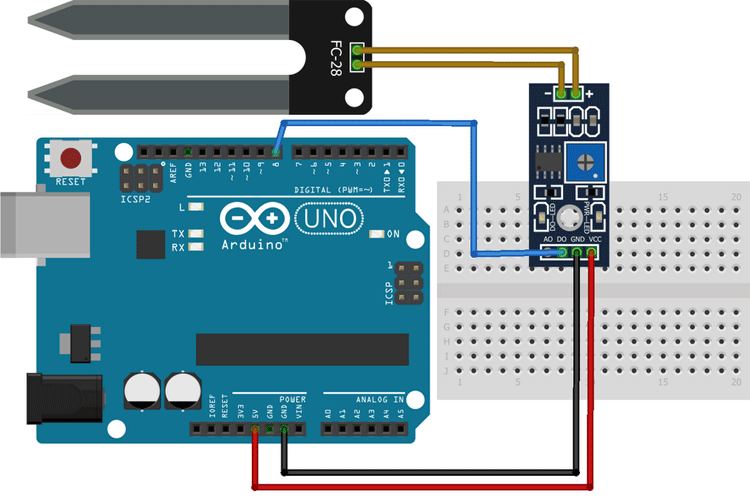
Connecting a soil moisture sensor to Arduino or any other microcontroller is pretty simple. As we all know the sensor outputs both analog and digital signals so processing this signal is very easy.
Soil Moisture Sensor with Arduino Code
The code for Arduino Based Soil Moisture Sensor is very simple and easy to understand. We are just reading the analog data out of the sensor and changing the brightness of the LED according to the received data. Please do remember that we are only processing the analog data coming out of the sensor for the digital data you can see the onboard LED in the module lights up.
We initialize our code by declaring two macros, the first one is for the led where we will connect an LED and the second one is the sensorPin through which we are reading the data coming out of the sensor.
// Sensor pins pin D6 LED output, pin A0 analog Input
#define ledPin 6
#define sensorPin A0
Next, we have our setup() function. In the setup function, we initialize the serial with 9600 baud. We also set the ledPin as output, and make the pin LOW. This way the pin will not float and turn the LED on.
void setup() {
  Serial.begin(9600);
  pinMode(ledPin, OUTPUT);
  digitalWrite(ledPin, LOW);
}
Next, we have our loop() function, in the loop function we print "Analog output:" as text on the serial monitor window and then we call the readSensor() function inside a Serial.println() function so that once the readSensor() function is executed, it returns the data and it also gets printed on the serial monitor window,
void loop() {
  Serial.print("Analog output: ");
  Serial.println(readSensor());
  delay(500);
}
Finally, we have our custom readSensor() function which returns the analog value that is read through the A0 pin of the Arduino. In the first line of this function, we have declared and defined a variable called sensorValue where we are putting the raw data, that is read through the A0 in the Arduino. This data is in 10-bit format and it goes from 0 -1023 so to convert that 10-bit data to 8-bit data. That is why we have used the map function, once the map function outputs the data we have initiated another variable outputValue and put the mapped data inside that variable. Finally, we have used the built-in analogWrite(ledPin, outputValue) function of the Arduino to generate a PWM signal that is proportional to the input data read by the ADC of the arduino
This marks the end of the code portion of the Arduino-based Soil Moisture sensor code. If you have any questions regarding the code do not hesitate to comment it down below.
int readSensor() {
  int sensorValue = analogRead(sensorPin);  // Read the analog value from sensor
  int outputValue = map(sensorValue, 0, 1023, 255, 0); // map the 10-bit data to 8-bit data
  analogWrite(ledPin, outputValue); // generate PWM signal
  return outputValue;             // Return analog moisture value
}
Working of the Soil Humidity Sensor Module
The gif down below shows the Soil Moisture Sensor in working. At first, you can see the intensity of the LED on the breadboard is low but when a little bit of water is added to the pot, the intensity of the LED increases, and with that, the onboard led of the module also lights up.
Soil Moisture Sensor Arduino Projects
Previously we have used this soil moisture sensor to build many interesting projects. If you want to know more about those topics, links are given below.
IoT based Soil Moisture Monitoring Device
Build your own compact smart Smart Agriculture Monitoring System with ESP8266 based battery powered soil moisture probe with Arduino and basic components. If there is a situation where you need to measure the soil moisture of a large area this little wireless device can be a lifesaver.
Automatic Irrigation System using Arduino
In this project you can learn how you can build your own automatic plant watering system with Arduino, ESP8266, and a Soil Moisture Sensor. This project is simple and made with easily available components so the reflecting process is very easy.
IoT based Smart Agriculture Monitoring System
Build your own IoT based Smart farming system switch Arduino and ESP8266 and other different sensors. The objective of this project is to offer assistance to the firmers and show them temperature, humidity, soil moisture, soil temperature and other data parameters.
Simple Soil Moisture Detector Circuit
If you are a beginner at electronic and circuit design, and you are interested in soil moisture sensors this simple project could be for you as this project uses a piece of perfboard as soil moisture sensor and uses analog circuitry designed with basic transistors to detect soil moisture..
Code and Schematics
Here is the link to our GitHub repo, where you'll find the source code, schematics, and other necessary files for this Arduino soil moisture sensor interfacing tutorial. It's a straightforward collection of resources aimed at helping you understand and test the soil moisture sensor interfacing we have discussed in the tutorial.
Complete Project Code
// Moisture Sensor Arduino Code
//By Circuitdigest

#define ledPin 6
#define sensorPin A0

void setup() {
  Serial.begin(9600);
  pinMode(ledPin, OUTPUT);
  digitalWrite(ledPin, LOW);
}

void loop() {
  Serial.print("Analog output: ");
  Serial.println(readSensor());
  delay(500);
}

//  This function returns the analog data to calling function
int readSensor() {
  int sensorValue = analogRead(sensorPin);  // Read the analog value from sensor
  int outputValue = map(sensorValue, 0, 1023, 255, 0); // map the 10-bit data to 8-bit data
  analogWrite(ledPin, outputValue); // generate PWM signal
  return outputValue;             // Return analog moisture value
}

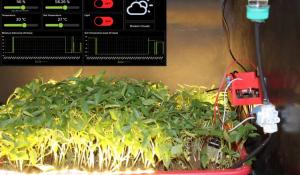
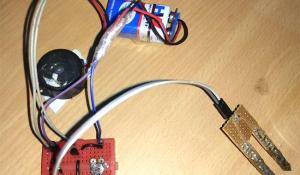


The sensor is not going to last very long. Electrolysis will cause the electrodes to be eaten away , and the circuit will stop working.
Capacitive sensors are better for this application. Since you already have the circuit built , you can try and turn off power to the sensing circuit
when you are not doing a reading.
Moisture does not change that rapidly , so you could leave the sensor circuit unpowered most of the time and only switch on power briefly to take a reading and turn power off again afterwards. This will greatly extend the life of the sensor. It's a very low power circuit , you could probably power it from one of the Arduino IO pins.
Cheers
Rob