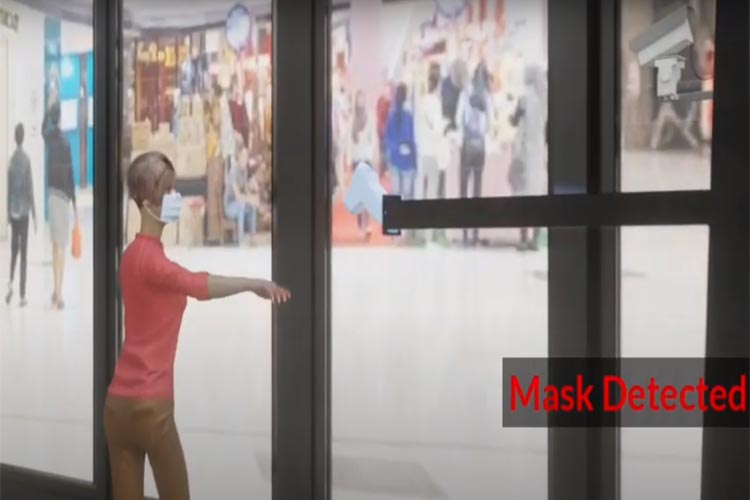
Coronavirus disease 2019 (COVID-19) is an infectious disease caused by severe acute respiratory syndrome coronavirus. More than two years into the pandemic, there have been many million confirmed cases of COVID-19 worldwide. Many more have probably gone undocumented. For safety purposes, we made an interesting project, CovAid. The CovAid is an electric door that locks for those who do not wear masks or suffering from fever. This project is made using Raspberry Pi. If you are a beginner, you should check out more raspberry pi projects to learn more about them.
Component Required for CovAid

- Raspberry Pi
- PI-Camera
- MLX90614
- Linear Servo Motors
Hardware/Software Selections for CovAid
Tensorflow
TensorFlow is a free and open-source software library for machine learning and artificial intelligence. It can be used across a range of tasks but has a particular focus on the training and inference of deep neural networks. A good platform for object detection.
Python
It is an open-source language that supports a variety of packages and is a popular language for making automated projects.
Raspberry Pi
The best computer in terms of size to performance ratio and it is cheap as well. It supports enough computing power to run object detection. We have done a face mask detection project using Raspberry Pi and TensorFlow
MLX90614
It is an infrared temperature detection sensor to make the temperature detection contactless. It is small in size and low in cost. It is also easy to integrate. It features Factory calibrated in wide temperature range: -40 to 125°C for sensor temperature and -70 to 380°C for object temperature.
Linear Servo Motors
A linear servo motor is a direct drive solution where the load is directly connected to the moving portion of the motor. Direct drive linear motors are available in a variety of configurations (iron core, U-channel, tubular) but ultimately work the same.
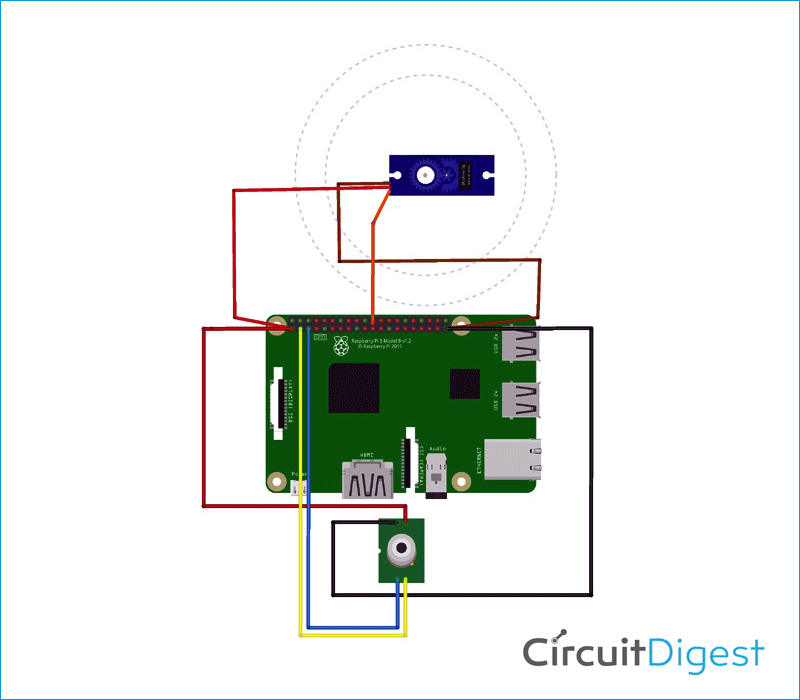
Circuit Diagram for CovAid
As you can see above in the circuit diagram for CovAid, made your connection according to as below,
(Raspberry pi) SDA - (MLX90614) SDA (Raspberry pi)SCL - (MLX90614) SCL (Raspberry pi)VCC - (MLX90614) VCC (Raspberry pi)GND - (MLX90614) GND
Conclusion
CovAID-An electronic door system which will stop entering people who are suffering from fever or not wearing masks from public places. We noticed the carelessness of staff who were irresponsible in keeping social distance while having fever and wearing masks. That's the reason for increasing Corona cases day by day. So before entering, the CovAid door will check the body temperature and mask of people through infrared and object detection respectively and it will stop entry if you do not wear a mask or have a high body temperature. If you have any questions regarding this, feel free to ask in the comment section or in our forum.
Complete Project Code
#----------------------Object detection INSTRUCTIONS ----------------------
'''download the necessary files and packages for object detection from
 https://github.com/PettyScientist/CovAID-object-detection-/blob/main/detect_mask_picam.py'''
#type this command to install openCV  --  pip install opencv-contrib-python
#----------------------------Infrared thermometer(MLX90614)INSTRUCTIONS -----------------------
# Enable I2C and PI Camera in raspberry settings, the procedure for the same is given in the presentation.
# Download the package of MLX90614 form the given link  --  https://pypi.org/project/PyMLX90614/#files
''' These are commands for raspberry pi terminal window
tar -xf PyMLX90614-0.0.3.tar.gz        (to extract the folder with the extension of tar -xf file)
sudo apt-get install python-setuptools
sudo apt-get install -y i2c-tools
sudo apt-get install RPi.GPIO
sudo apt-get install Adafruit Blinka
sudo apt-get install adafruit-circuitpython-mlx90614/
apt-get install python3-rpi.gpio                                (to install the packages)
Go in the PyMLX90614-0.0.3 by typing ** cd PyMLX90614-0.0.3/
Now type this command - sudo python setup.py install
'''
**********************************************************************************************************
from tensorflow.keras.applications.mobilenet_v2 import preprocess_input
from tensorflow.keras.preprocessing.image import img_to_array
from tensorflow.keras.models import     load_model
from imutils.video import VideoStream
from gpiozero import Servo
import numpy as np
import argparse
import imutils
import time
import cv2
import os
import RPi.GPIO as gpio
import board
import busio as io
import adafruit_mlx90614
***********************Face Mask Detection********************
def detect_and_predict_mask(frame, faceNet, maskNet):
    # grab the dimensions of the frame and then construct a blob
    # from it
    (h, w) = frame.shape[:2]
    blob = cv2.dnn.blobFromImage(frame, 1.0, (300, 300),
        (104.0, 177.0, 123.0))
    # pass the blob through the network and obtain the face detections
    faceNet.setInput(blob)
    detections = faceNet.forward()
    # initialize our list of faces, their corresponding locations,
    # and the list of predictions from our face mask network
    faces = []
    locs = []
    preds = []
    # loop over the detections
    for i in range(0, detections.shape[2]):
        # extract the confidence (i.e., probability) associated with
        # the detection
        confidence = detections[0, 0, i, 2]
        # filter out weak detections by ensuring the confidence is
        # greater than the minimum confidence
        if confidence > args["confidence"]:
            # compute the (x, y)-coordinates of the bounding box for
            # the object
            box = detections[0, 0, i, 3:7] * np.array([w, h, w, h])
            (startX, startY, endX, endY) = box.astype("int")
            # ensure the bounding boxes fall within the dimensions of
            # the frame
            (startX, startY) = (max(0, startX), max(0, startY))
            (endX, endY) = (min(w - 1, endX), min(h - 1, endY))
            # extract the face ROI, convert it from BGR to RGB channel
            # ordering, resize it to 224x224, and preprocess it
            face = frame[startY:endY, startX:endX]
            face = cv2.cvtColor(face, cv2.COLOR_BGR2RGB)
            face = cv2.resize(face, (224, 224))
            face = img_to_array(face)
            face = preprocess_input(face)
            # add the face and bounding boxes to their respective
            # lists
            faces.append(face)
            locs.append((startX, startY, endX, endY))
    # only make a predictions if at least one face was detected
    if len(faces) > 0:
        # for faster inference we'll make batch predictions on *all*
        # faces at the same time rather than one-by-one predictions
        # in the above `for` loop
        faces = np.array(faces, dtype="float32")
        preds = maskNet.predict(faces, batch_size=32)
    # return a 2-tuple of the face locations and their corresponding
    # locations
    return (locs, preds)
# construct the argument parser and parse the arguments
ap = argparse.ArgumentParser()
ap.add_argument("-f", "--face", type=str,
    default="face_detector",
    help="path to face detector model directory")
ap.add_argument("-m", "--model", type=str,
    default="mask_detector.model",
    help="path to trained face mask detector model")
ap.add_argument("-c", "--confidence", type=float, default=0.5,
    help="minimum probability to filter weak detections")
args = vars(ap.parse_args())
# load our serialized face detector model from disk
print("[INFO] loading face detector model...")
prototxtPath = os.path.sep.join([args["face"], "deploy.prototxt"])
weightsPath = os.path.sep.join([args["face"],
    "res10_300x300_ssd_iter_140000.caffemodel"])
faceNet = cv2.dnn.readNet(prototxtPath, weightsPath)
# load the face mask detector model from disk
print("[INFO] loading face mask detector model...")
maskNet = load_model(args["model"])
# initialize the video stream and allow the camera sensor to warm up
print("[INFO] starting video stream...")
#vs = VideoStream(src=0).start()
vs = VideoStream(usePiCamera=True).start()
time.sleep(2.0)
# loop over the frames from the video stream
while True:
    # grab the frame from the threaded video stream and resize it
    # to have a maximum width of 400 pixels
    frame = vs.read()
    frame = imutils.resize(frame, width=500)
    # detect faces in the frame and determine if they are wearing a
    # face mask or not
    (locs, preds) = detect_and_predict_mask(frame, faceNet, maskNet)
    # loop over the detected face locations and their corresponding
    # locations
    for (box, pred) in zip(locs, preds):
        # unpack the bounding box and predictions
        (startX, startY, endX, endY) = box
        (mask, withoutMask) = pred
        # determine the class label and color we'll use to draw
        # the bounding box and text
        if mask > withoutMask:
            label = "Thank You. Mask On."
            a=1
            color = (0, 255, 0)
        else:
            label = "No Face Mask Detected"
            a=0
            color = (0, 0, 255)
        #label = "Thank you" if mask > withoutMask else "Please wear your face mask"
        #color = (0, 255, 0) if label == "Thank you" else (0, 0, 255)
        # include the probability in the label
        #label = "{}: {:.2f}%".format(label, max(mask, withoutMask) * 100)
        # display the label and bounding box rectangle on the output
        # frame
        cv2.putText(frame, label, (startX-50, startY - 10),
            cv2.FONT_HERSHEY_SIMPLEX, 0.7, color, 2)
        cv2.rectangle(frame, (startX, startY), (endX, endY), color, 2)
    # show the output frame
    cv2.imshow("Face Mask Detector", frame)
    key = cv2.waitKey(1) & 0xFF
    # if the `q` key was pressed, break from the loop
    if key == ord("q"):
        break
# do a bit of cleanup
cv2.destroyAllWindows()
vs.stop()
#**********************Infrared detection**************************
i2c = io.I2C(board.SCL, board.SDA, frequency=100000)
mlx = adafruit_mlx90614.MLX90614(i2c)
ambientTemp = "{:.2f}".format(mlx.ambient_temperature)
targetTemp = "{:.2f}".format(mlx.object_temperature)
time.sleep(0.5)
fahrenheit = (targetTemp * 1.8) + 32
if fahrenheit > 99:
    b = 0
elif fahrenheit <= 99:
    b = 1
#***************************** CONDITION LOOP***************************
servo = Servo(25) # it defines the pin 25 for servo motor to control the gate
''' we are using a 360 degree motor for the slide gate
servo.max means gate open and servo.min means gate closed.'''
if a==1 and b==1:
    servo.max()                # both variables showing 1 means the person has worn the mask and doesn't suffer from fever
elif a==1 and b==0:
    servo.min()                #if a=1 and b=0 means the person has worn the mask but suffer from fever
elif a==0 and b==1:
    servo.min()                #if a=0 and b=1 means the person hasn't worn the mask but doesn't suffer from fever
elif a==0 and b==0:
    servo.min()                # both variables showing 1 means the person hasn't worn the mask and suffer from fever
#**************************************    END     ***********************************


