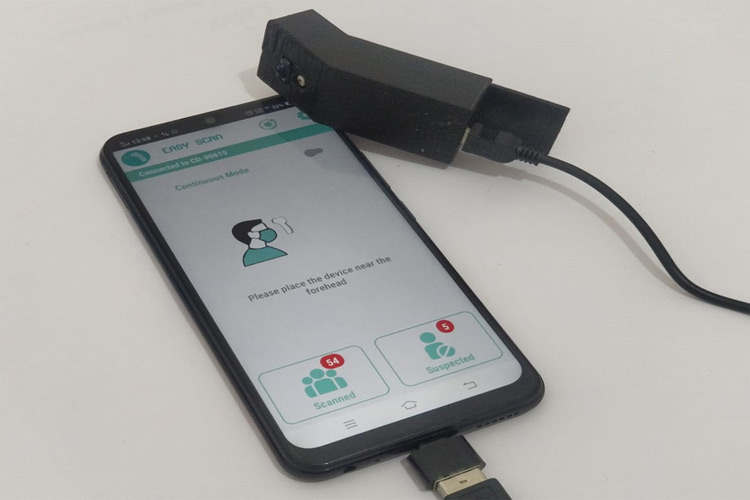
The current COVID-19 scenario needs no introduction. While everyone is giving their best to move forward, it is important to act responsibly and tackle this problem collectively. Today in many public places and in other gatherings, it has become common to screen individuals for body temperature, as a preventive measure to check for fever. The device that is used to do this is called a Contactless Infrared Thermometer. As many might have noticed, there is a huge surge in demand for this product, but it is not very hard to build one on your own which could not only serve its purpose but also provide more useful features than the commercial ones. Previously (long back before the outbreak) we have also built a handheld contactless IR thermometer gun, you can also check that out if interested.
So, the objective of this tutorial is to design a Low cost, Easy to build Contactless Thermometer that can measure body temperature, log them into an excel along with the picture of the individuals so that the record can be easily shared with concerned authorities. Intriguing right!! let’s get started….
Low Cost and Easy to Build – Android App for Rescue
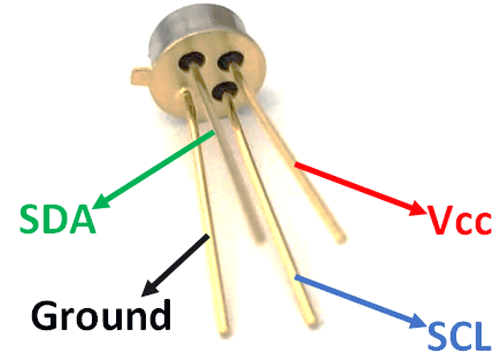
On a quick look, we can distinct some of the important parts on a thermometer, namely the IR temperature sensor, microcontroller, Display, Display driver, and the Battery. Now our objective here is to reduce the cost and the most expensive material (at the time of documentation) is the IR temperature sensor itself. Sadly, though as a maker, there are not many options here that you can reach out quickly other than MLX90614 and MLX90615. On the other hand, if you are okay with using an Analog sensor, you will have many cheaper alternatives but it won’t be easy to build and calibrate your device, the choice is yours here. For this tutorial, we will be using the MLX90615 sensor from Melexis.
With the sensor selected, we are only left with Microcontroller, Display, and Battery. So we decided to cut down the cost of all these three parts by leveraging an Android Mobile Phone. Today almost everyone has a good android phone with a decent camera. We can create a simple Android application that can communicate with our thermometer and perform other activities like data logging and image capture. This way we can not only make it work faster but can also increase its potential application by instantaneously sharing log results with pictures on WhatsApp, Gmail, or any other preferred platform. This is why we created our Android application called “Easy Scan” which is open-sourced and the APK is also free to download, more on this later. So the only material required for this project is-
- MLX90615 IR Temperature Sensor
- TCRT5000 IR Sensor
- Arduino Nano
Why TCRT5000 and Arduino Nano?
For many people, this question would have popped up. The reason for using a TCRT5000 IR sensor is to detect the position of the thermometer and take temperature reading automatically. This way you would never have to do anything with the application once it is launched making it easy to use. Also, the reading will be taken only when the sensor is in the right distance from the person so we not worry about false readings.
The reason for using Arduino Nano is that it has an in-built USB interface which is important to communicate between the controller and the phone. If you do not have one, you can also use the Mega or even the UNO. But speaking on cost terms, you can even use a much low power microcontroller like STM8S or any other controller that supports I2C, ADC, and UART will work fine for this project.
Interfacing MLX90615 and TCRT5000 with Arduino
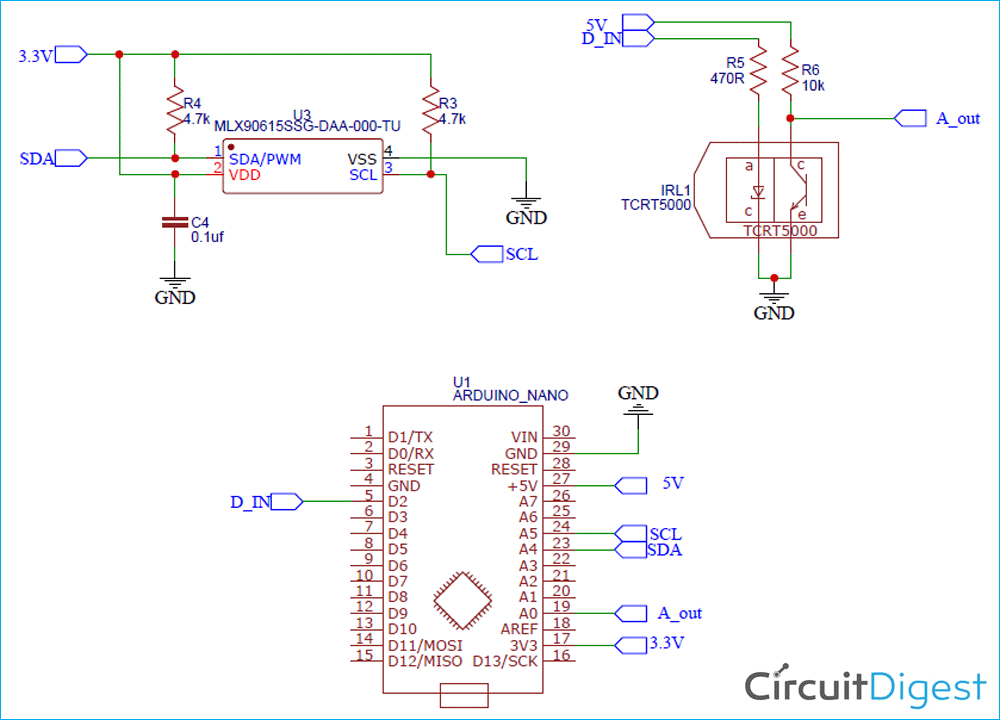
The circuit diagram of our project is very simple, we only have to connect the MLX90615 and TCRT5000 sensor with our Arduino nano board. The complete circuit diagram for Contactless Body Thermometer is given below.
The MLX90615 and TCRT500 operate on 3.3V and 5V respectively so we can power it accordingly. I2C communication pins A4 (SDA) and A5 (SCL) are used to communicate with the MLX90615 sensor. It is common to use TCRT5000 with an Op-Amp in comparator mode like we did in our BLDC remote car project but here we need it to be more reliable and our IR sensor should be immune to sunlight. So I have connected the IR diode to a digital pin and the Photodiode to an Analog pin of the Arduino. This way we can measure the value from photodiode during the normal stage and then measure again after turning on the IR LED, the difference between these two values should help us deal with noise. More on this will be discussed in the programming section.
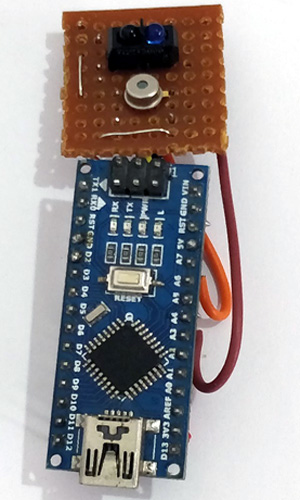
You can build a PCB for this if required but for quick prototyping, I have directly soldered the components on a perf board. My set-up looks like this when completed, we will be building a 3D printed case for this, so try following the same component spacing when you are building your protoboard.
Contactless Smart Thermometer – Arduino Program
The Arduino program for this project is very simple, thanks to the Arduino community. You can download the header file for MLX90615 provided by Sergey Kiselev from the below link.
The complete Arduino program for this project can be found at the bottom of this page, the explanation of this code is as follows.
We begin our program by adding the required header files and declaring the variables. There are two important variables here once is the error_correction value and other is the range sensitivity value. Even though the MLX90615 is factory calibrated, I found that the values were sensible only if I add an error correction value to it. In my case, I had to add 3.2 to the value I obtained from the sensor to get reliable values. I tested my values against a handheld thermometer and found that after adding this error correction value and found it to be reliable. The next variable is the Range sensitivity if we decrease this value, we can increase the range of our thermometer. Although the values are reliable, I am not sure if this is the best way to do it, any comment on this is welcomed.
float calibration = 3.2; //add this to actual value
int Range_sensitivity = 200; //Decrease this value to increase range
#include <Wire.h>
#include "MLX90615.h"
MLX90615 mlx = MLX90615();
Avoiding False Trigger Due to Sunlight with IR Sensor:
The next set of code that needs error correction is the way TCRT5000 is used in this project. It is possible to use it as a simple position sensor, but then the biggest drawback with the IR position sensor is that it will get triggered if IR rays from the sun directly fall on it.
To avoid this problem, we measure two values from our TCRT5000 sensor as explained in the circuit, the emitter LED of the IR sensor is connected to a digital pin and the receiver LED is connected to the Analog pin. Now in our program, we will read two values from our IR sensor, one is Noise and the other is Noise plus Signal. The Noise value will be measured while keeping the emitter IR LED turned off, so that the receiver IR LED will only tell about the sunlight intensity present in the environment. Then we will measure the Noise Plus signal after turning on the IR LED. Then in the program, we only have to subtract Noise from Noise Plus Signal and we will get our Signal value. The code to do that is shown below.
digitalWrite(2,HIGH);    // Turn on IR LED
delayMicroseconds(500);  // Forward rise time of IR LED
Noise_P_Signal=analogRead(A7);        // Read value from A0 => noise+signal
digitalWrite(2,LOW);     // Turn off IR LED
delayMicroseconds(500);  // Fall time of IR LED
Noise=analogRead(A7);        // Read value from A0 => noise only
Signal = Noise - Noise_P_Signal;
Once we know the Signal and Noise value, we can compare it to our Range_sensitivity value to check if the sensor is in close proximity to skin and if yes, we can send the temperature value through serial communication if not, we will just send position_error as output. If the noise value is very high (in this case greater than 500), it means the sensor is facing direct sunlight and we will not read the temperature in this case because I found the sensor values very unreliable when it is facing direct sunlight. Again, this should help avoid false readings.
if (Signal>Range_sensitivity && Noise >500) //dec. signal to increase rage
{
  if (trigger == true)
   Serial.println("start");
   digitalWrite(13,HIGH);
   temperature = (mlx.get_object_temp()) + error_correction;
  Serial.println(temperature,1);
  delay(100);
  trigger = false;
}
else
{
  delay(100);
  trigger = true;
  digitalWrite(13,LOW);
  Serial.println("position_error");
}
Easy Scan Android Application
The most feature rich part of this project is the Easy Scan Android Application. You can download this application APK file from the below link.
Download Easy Scan Android Application
We will not be getting into details on how we developed this application since it is out of the scope of this article but if you are a developer, feel free to get the fork the Easy Scan Android application on Github and add new features or tweak according to your requirements.
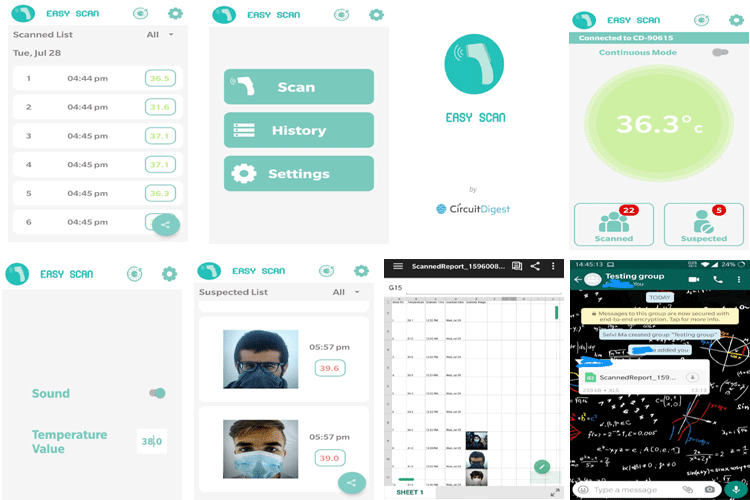
As mentioned earlier, the Android application allows us to store all the temperature values with a photograph and also share it as an excel file through Whatsapp E-mail, etc. Few screenshots of the applications are shown below.
3D Printed Enclosure for Contactless IR Thermometer
The idea of the project is to make the thermometer compact enough to mount it along with our phone. We designed a CAD model to fit all the electronics into a neat little box used paper clip to secure the device with the phone. The CAD model is shown below.
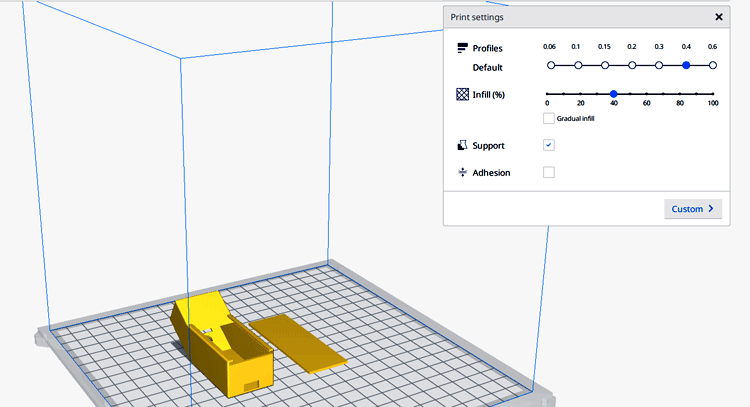
The design is very simple, it just houses all the electronics and provides an opening to mount the IR sensor and temperature sensor and also a slot to connect the programming cable to Arduino nano USB port. The sensor mounting is tilted buy 30 degree so that it gets mostly perpendicular when a user is holding it against another person’s forehead. We have used a simple sliding top piece to act as a cover. You can also download the complete cad file and STL from the below link to print the same enclosure if required.
Download STL files from Thingiverse
Note that the design was made to suit my perf board, you might have to tweak it a bit to match your board. Maybe in the future, we will have a PCB board and design a better casing. But for now, you can use the CAD model as a reference and make your own. Feel free to share your designs.
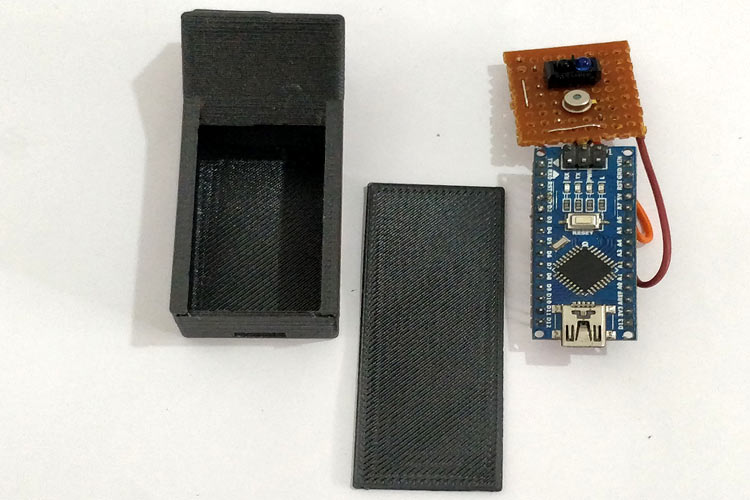
Testing Contactless Smart IR Thermometer with Easy Scan Android Application
Once the hardware is ready, upload the Arduino code given below. Then open the serial monitor and you see position error being displayed. If you bring your hand close to the sensor, you will see the value of temperature. You can use any existing IR thermometer to check if the values are correct if not you have to change your error correction value. My Serial monitor screenshot is given below.
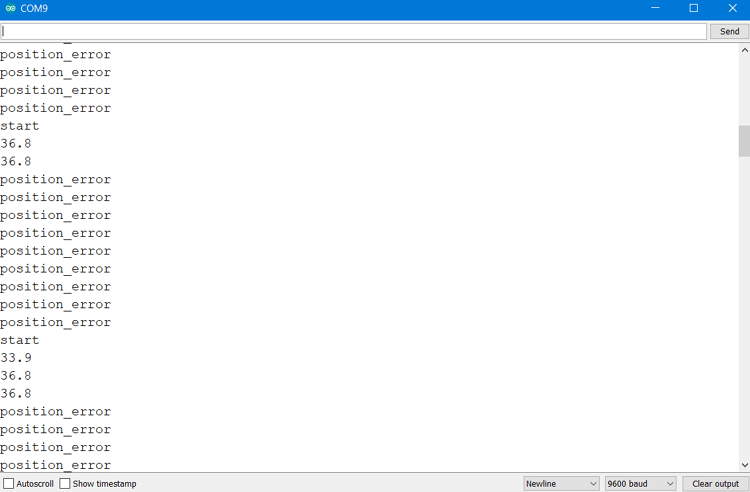
This will help us make sure the hardware and program are working as expected. After that use an OTG connector and connect your device to mobile phone. Both mobiles, with Type-C and micro USB port, were tested and found to be working. Make sure you turn on OTG in your mobile phone under setting options. Not all phones ask for this, but it never hurts to check.
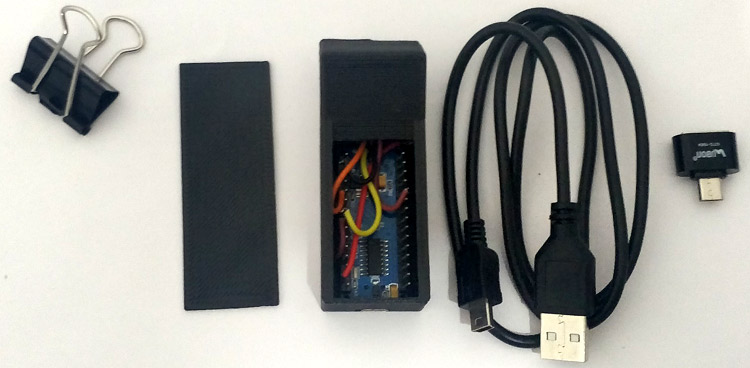
After making the connection, install the Easy Scan application using the APK shared earlier and launch the Application. Place the device against an object and if everything is working as expected, you should see the temperature value on the application.
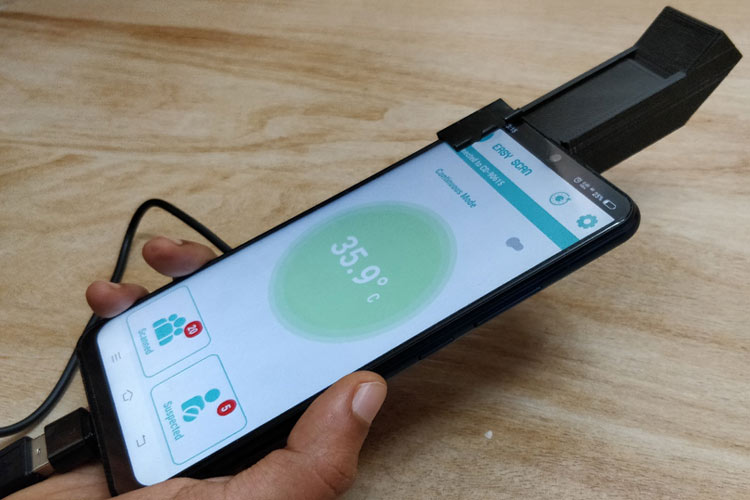
The application allows you to set threshold temperature, if the temperature is more than this threshold value, it will prompt you to take a picture. All the scanned records and be viewed on the application with time and date and can also be shared in Excel format for maintaining records. You can watch the video below for the complete working demonstration.
Hope you enjoyed the tutorial and found it useful. Feel free to use the designs, upgrade it, and share back. Any questions or comments are welcomed in the comment section below. You can also use our forums if you have any technical queries to be answered.
Complete Project Code
float error_correction  = 3.5; //add this to actual value
int Range_sensitivity = 200; //Decrease this value to increase range
#include <Wire.h>
#include "MLX90615.h"
MLX90615 mlx = MLX90615();
void setup()
{
Serial.begin(9600);
delay(100);
while (! Serial);
pinMode(2,OUTPUT);
mlx.begin();
}
int Noise;
int Signal;
int Noise_P_Signal;
boolean trigger = true;
float temperature;
float pvs_temperature;
void loop()
{
digitalWrite(2,HIGH);    // Turn on IR LED
delayMicroseconds(500);  // Forward rise time of IR LED
Noise_P_Signal=analogRead(A7);        // Read value from A0 => noise+signal
digitalWrite(2,LOW);     // Turn off IR LED
delayMicroseconds(500);  // Fall time of IR LED
Noise=analogRead(A7);        // Read value from A0 => noise only
Signal = Noise - Noise_P_Signal;
//Serial.print("Noise + Signal = "); Serial.println(Noise_P_Signal);
//Serial.print("Noise ="); Serial.println(Noise);
//Serial.print ("--> Signal ="); Serial.println (Signal);
//temperature = (mlx.get_object_temp()) + error_correction;
//Serial.println(temperature,1);
//delay(100);
if (Signal>Range_sensitivity && Noise >500) //dec. signal to increase rage
{
  if (trigger == true)
   Serial.println("start");
   digitalWrite(2,LOW); //Turn off IR sensor to avoid interferance.
   for (int i=1; i<=3; i++)
   {
   temperature = (mlx.get_object_temp()) + error_correction;
   Serial.println(temperature,1);
   delay(150);
   }
  trigger = false;
}
else
{
  delay(100);
  trigger = true;
  digitalWrite(13,LOW);
  Serial.println("position_error");
}
}Comments
Arduino code is not compiling
Arduino code is not compiling
Showing error
Arduino: 1.8.13 (Windows 10), Board: "Arduino Nano"
sketch_Orion13:4:10: fatal error: MLX90615.h: No such file or directory
#include "MLX90615.h"
^~~~~~~~~~~~
compilation terminated.
exit status 1
MLX90615.h: No such file or directory
This report would have more information with
"Show verbose output during compilation"
option enabled in File -> Preferences.
error in contactless Smart IR Thermometer using Arduino and Andr
thank you sourab sir for helping to install easy app.
i amfacing anather problem in including mlx90615.h file to my program
Error: No matching function fr call to ' MLX90615::MLX9061590'.
i have downloaded mlx90615 from Download MLX90615 header file.
but i find it very difficult to include mlx90615 header file
please help me sir
Use the correct header file
There are more than one version of header file for MLX90615 use only this https://circuitdigest.com/sites/default/files/Contactless-Smart-Thermom…
Other headers will give error
sir aswinth raj
sir aswinth raj
i tried to download MLX90615.h file from the link https://circuitdigest.com/sites/default/files/Contactless-Smart-Thermome... but now i am getting error likethis : error compiling for board arduino nano . and i checked mlx90615 is installed manage libraries. please help to come out off this error: error compiling for board arduino nano.
Post full error
Please use the forum to post your question and also post your full error code I will check it
contact less Smart IR Thermometer using Arduino and Android
sir please give the step by step procedure to download and add mlx90615.h header file
to my project contact less Smart IR Thermometer using Arduino and Android.
because i am new to this .please help sir
Hi was ur problem solved?
Hi was ur problem solved?
If yes I would really appreciate if you could help me
guidance for circuit diagram
Thanks for the project and app. I have made the same.
Some how my project is not working in final steps.
I think so I may be wrong in circuit reading.
I have made circuit diagram reference to your circuit diagram and soldered all components. but some how I am unable to access reading.
My name is Jignesh Dharia
M: 9821030140
Emai: [email protected].
If you will share your email I will send entire diagram to show and also images of several stages, Images of serial port reading. etc.
Please do the needful.
Sincerely Yours,
Jignesh Dharia
Error: redefinition class MLX90615
This is what I input
#if (ARDUINO >= 100)
#include "Arduino.h"
#else
#include "WProgram.h"
#endif
#include "Wire.h"
// default MLX90615 I2C address
#define MLX90615_I2C_ADDR 0x5B
// ROM - ID number
#define MLX90615_REG_ID_LOW 0x1E
#define MLX90615_REG_ID_HIGH 0x1F
// RAM - ambient temperature register
#define MLX90615_REG_TEMP_AMBIENT 0x26
// RAM - object temperature register
#define MLX90615_REG_TEMP_OBJECT 0x27
class MLX90615 {
public:
MLX90615(uint8_t i2c_addr = MLX90615_I2C_ADDR);
void begin();
uint32_t get_id();
float get_object_temp();
float get_ambient_temp();
private:
uint8_t i2c_addr_;
uint16_t read_word16(uint8_t reg);
};
float error_correction = 3.5; //add this to actual value
int Range_sensitivity = 200; //Decrease this value to increase range
#include <Wire.h>
#include <MLX90615.h>
MLX90615 mlx = MLX90615();
void setup()
{
Serial.begin(9600);
delay(100);
while (! Serial);
pinMode(2,OUTPUT);
mlx.begin();
}
int Noise;
int Signal;
int Noise_P_Signal;
boolean trigger = true;
float temperature;
float pvs_temperature;
void loop()
{
digitalWrite(2,HIGH); // Turn on IR LED
delayMicroseconds(500); // Forward rise time of IR LED
Noise_P_Signal=analogRead(A7); // Read value from A0 => noise+signal
digitalWrite(2,LOW); // Turn off IR LED
delayMicroseconds(500); // Fall time of IR LED
Noise=analogRead(A7); // Read value from A0 => noise only
Signal = Noise - Noise_P_Signal;
//Serial.print("Noise + Signal = "); Serial.println(Noise_P_Signal);
//Serial.print("Noise ="); Serial.println(Noise);
//Serial.print ("--> Signal ="); Serial.println (Signal);
//temperature = (mlx.get_object_temp()) + error_correction;
//Serial.println(temperature,1);
//delay(100);
if (Signal>Range_sensitivity && Noise >500) //dec. signal to increase rage
{
if (trigger == true)
Serial.println("start");
digitalWrite(2,LOW); //Turn off IR sensor to avoid interferance.
for (int i=1; i<=3; i++)
{
temperature = (mlx.get_object_temp()) + error_correction;
Serial.println(temperature,1);
delay(150);
}
trigger = false;
}
else
{
delay(100);
trigger = true;
digitalWrite(13,LOW);
Serial.println("position_error");
}
}
but it detects error
Arduino: 1.8.13 (Windows 10), Board: "Arduino Nano, ATmega328P"
ed from C:\Users\user\Documents\Arduino\.ino:34:0:
C:\Users\user\Documents\Arduino\libraries\Digital_Infrared_Temperature_Sensor_MLX90615/MLX90615.h:15:7: error: redefinition of 'class MLX90615'
class MLX90615 {
^~~~~~~~
C:\Users\user\Documents\Arduino\.ino:19:7: note: previous definition of 'class MLX90615'
class MLX90615 {
^~~~~~~~
exit status 1
Error compiling for board Arduino Nano.
Hi Vince was your problem
Hi Vince was your problem solved?
If yes would u mind to let me know how you did it pls
Can we use any other sensor
Can we use any other sensor instead of MLX90615 other than MLX90614
Hi, What changes are needed
Hi, What changes are needed to use MLX90614 instead of MLX90615? Please reply soon
Also, it is showing disabled
Also, it is showing disabled port after connecting arduino nano. What to do?
Hi. did your problem solved?
Hi. did your problem solved? if it successfully can you help me? that is my email ( [email protected] )
hopefully you can help me. Thank you :)
could you please inform
could you please inform whether it is possible to do this project with MLX90614 instead of MLX90615?
If it is possible pl mention the changes in the arduino code.
Thanksss.
Sir , i had followed all your
Sir , i had followed all your instructions and uploaded code also.but after opening serial monitor iam not getting temperature instead iam getting only position error in a loop .... is there any solution for my problem,anyone could please help me to solve my problem
hello CircuitDigest,
hello CircuitDigest,
your project contactless IR sensor thermometer is a very nice and productive project. my query regarding this project is that if I want to run a simulation on this circuit then can I? if yes then will you provide me a circuit diagram for that?because I have tried it in proteus software and I couldn't perform that's why.
Is it possible if i use
Is it possible if i use mlx90614. The easy app compatible with mlx90614?
Interesting. I wish I had
Interesting. I wish I had found this earlier when the crunch was on for the Covid, now that it's pretty much a memory, I am trying to build a different device, however some of your proceedure may well come in handy. This is to be a device used for ghost hunting in haunted houses in the old west towns around this part of the Dakota's. There is a lot of history, many battles that took place during the settelment of this nation so the spirits of the dead are all around us. They are sometimes found by the drop in the tempature in one specific area, this device paired with a small sonar device hooked to an EPS32 should prove very handy with the ghost hunters who I support with electronic devices built here in my living room.
Error arises while compiling
Error arises "'MLX90615' does not name a type"
while compiling my program, please give me solution for this
I think you did not include
I think you did not include library in you code
Include below library in your code:
#include "MLX90615.h"
Good day sir! I have used
Good day sir! I have used MLX90614 in my IR hardware and it is already running but the problem that I encounter now is that the hardware is not connecting to the app and i have lost my ways on how to solve this problem. Ive used your project for my Capstone Project may you lend me your help please.
Can you explain the problem
Can you explain the problem in a bit more detialed way?
What are you seeing when you connect the hardware with phone ?
Hi is the MLX90614 sensor
Hi is the MLX90614 sensor same as ISB TS45D Infrared Thermopile Sensor?
Hi, I tried with the sensor
Hi, I tried with the sensor and it returns only 1014.0 value and the data from SDA is always high value (65535) . I also checked the connections and everything is fine, am I missing something.
Hi, i am currently doing…
Hi, i am currently doing this project and my easyscan app file is not able to scan and save data on the android. can you help me on this...




Congrats! It's a very useful and awesome project.
Thank you for sharing.